
| |
Generic Face Editing |
| <<< Creating New Bodies From Existing Entities | Chapters | Introduction To Blending >>> |
You may sometimes need to perform a number of different local operations to different faces in the same body. Some faces might need offsetting, while others require tapering. Blend faces may need to be reconstructed after moving other faces in the body. There are two approaches to this type of problem:
The second approach can have a number of benefits over the first:
|
Note: This functionality partially supports facet geometry. See PK_FACE_change for more information. |

Figure 72-1 Moving a blended boss feature using generic face editing
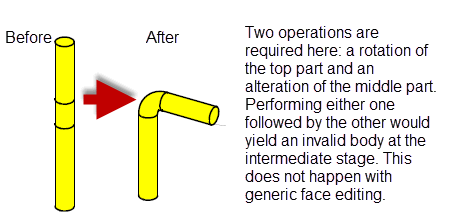
Figure 72-2 Performing operations without yielding invalid bodies
Note: PK_FACE_change accepts general bodies in each of the following circumstances:
|
PK_FACE_change lets you perform any combination of a range of local operations, as described below:
|
You can offset any face by a specified distance, either relatively from each changed face, or from the resultant position of an optional supplied reference face. A positive offset indicates an offset outwards (in the direction of the face normal) and a negative offset an offset inwards. This operation allows a subset of the functionality offered by PK_FACE_offset_2: see Chapter 58, “Offsetting”, for more information. |
|
|
You can replace the surface of any face with a taper surface: see Chapter 64, “Tapering”, for more information. |
|
|
You can transform the geometry of any face: see Chapter 70, “Moving Faces”. You can also transform a set of faces in a manner very similar to patterning: see the relevant section in Section 72.3, “Operation parameters”, and also Section 54.3.5, “General patterning”. |
|
|
You can replace the geometry of any face with a new surface: see Chapter 65, “Replacing The Surfaces Of Faces”, for more information. See also Section 68.6, “Replacing a set of faces with a single face”. |
|
|
You can recalculate blends and reconstruct blend faces after moving other faces in a body. This operation may only be used on faces with blend surfaces. |
|
|
You can bend or unbend faces between two groups of faces that are being transformed. This functionality can be particularly useful for sheet metal bending operations. See Section 72.3.6, “Data for bend operations”, for information on bending operations. |
|
|
You can replace a set of target faces within a body with a set of tool faces from another body. This operation provides the same functionality as that offered by PK_FACE_replace_with_sheet: see Section 68.1, “Introduction”, for more information. |
|
|
You can perform local deformation of a set of target faces in a body, by providing an evaluation function that maps three-space points on the target faces to deformed three-space points. See Section 72.3.8, “Data for deformation operations”, for more information. |
|
|
You can radially displace a rotational surface of a face with respect to its spin axis. See Section 72.3.9, “Data for radiate operations”, for more information. |
For examples of this functionality, see the code examples in the
C++\Code Examples\Modelling\LOP\Face Change
folder, located in
example_applications
in your Parasolid installation folder.
|
Note: The blend and bend operations described in this chapter cannot be used on bodies that contain facet geometry. |
PK_FACE_change takes the following arguments:
n_faces |
|
faces |
The faces to change. These faces can come from more than one body, but there are restrictions in this case. See Section 72.2, “Specifying operations”, for details. |
mapping |
An array mapping operations onto faces. See Section 72.2, “Specifying operations”, for details. |
n_operations |
|
operations |
The operations to perform. This is an array of PK_FACE_change_t types, and can be any combination of the following operations: See Section 72.2, “Specifying operations”, for details of how to specify operations. |
tolerance |
|
options |
Options structure specifying options for the call. See Section 72.5, “Specifying options”, for details. |
Supplied faces are mapped onto different operations using the
mapping
array. This array should contain the same number of elements as the
faces
array. Each integer in
mapping
indicates the operation to perform on the corresponding face in
faces
. This is illustrated in
Figure 72-3.
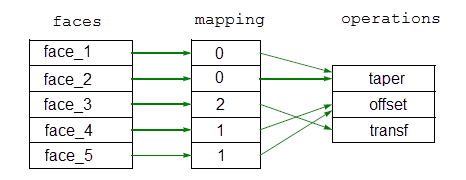
Figure 72-3 Mapping faces onto operations
An operation in the
operations
array is specified using PK_FACE_change_t. This contains the following fields:
op_type |
The type of operation to perform on a face. This is one of the following:
The default value is PK_FACE_change_none. See Section 72.1.1 for more information. |
op_param |
Parameters for the change operation. This field is a union of the parameters for each individual operation. See Section 72.3, “Operation parameters”. |
op_opts |
Change-specific options. This field is a union of the options for each individual operation. See Section 72.4, “Operation-specific options” |
Faces in different bodies cannot share the same mapping. Thus, in
Figure 72-3,
face_1
and
face_2
must come from the same body, and
face_4
and
face_5
must come from the same body (though this could be a different body to
face_1
and
face_2
).
If you want to perform the same operation on faces from different bodies, then you must duplicate identical operations in the
operations
array.
Data for an operation is specified in the
op_param
field, which itself contains fields for each type of operation supported by PK_FACE_change. The
op_param
field is a union of any data supplied in each of these operation-specific fields.
The fields available, together with the data you can specify, are described below
You need to supply the following data for each face you are offsetting using PK_FACE_change:
distance |
The offset distance for the faces, relative to their current position. If used in combination with the |
You need to supply the following data for each face you are tapering using PK_FACE_change:
direction |
|
angle |
|
n_refs |
|
references |
Multiple faces can be mapped to a single taper operation. In this case, the value of
n_refs
must be either one, or the number of faces mapped to the operation. If
n_refs
is the latter, each face entry in the array is mapped to a single reference entity in the corresponding position in the
references
array.
You need to supply the following data for each face you are transforming or otherwise altering using PK_FACE_change:
transform |
When you are transforming a set of faces such that the boundary loops move out of their original face, you also need to supply these loops and their destination faces in the options structure for this operation. See Section 72.4, “Operation-specific options” for more information.
You need to supply the following data for each face you are replacing using PK_FACE_change:
surface |
|
sense |
Orientation of
|
Blend faces are reconstructed automatically by PK_FACE_change. No data for blend operations needs to be supplied.
PK_FACE_change provides support for bending and unbending pairs of faces. This functionality generates ruled side surfaces between the resultant bent faces, and ensures that the geometry for the boundaries between the bend face and adjacent transformed or stationary faces is taken from the transformed or stationary adjacent face.
For each bend operation, you need to associate the following faces with the PK_FACE_change_type_bend_c
op_type
via the
mapping
array:
The faces associated with a bend operation are usually adjacent to a group of faces that are being transformed using PK_FACE_change, though this is not mandatory for the operation. When a bend surface shares a smooth edge with such a transformed surface (or a stationary surface), the bend geometry must match the transformed geometry along that smooth edge (that is, the bend is a transition surface between that transform and something else).
Parasolid generates new inner and outer bend faces by offsetting a tool entity that you supply. The shape of the tool entity should be the exact shape of the resultant bent faces because Parasolid generates ruled surfaces for any side faces using an appropriate edge from the tool entity.The tool entity is therefore used as a “template” for both the bend faces and the side faces. These components are illustrated in Figure 72-4.
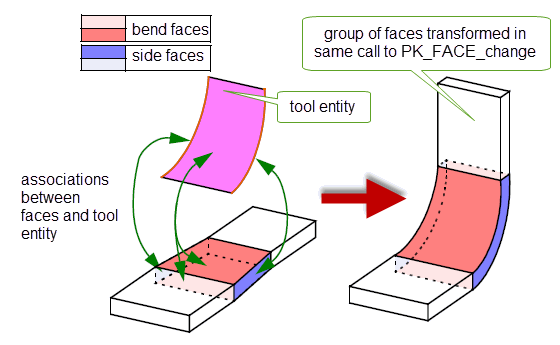
Figure 72-4 Components in a bend operation
After the bend operation, bend faces are still offsets of each other, and side faces have ruled surfaces as geometry.
You need to supply the following data for each face in a bend operation:
For an example of this functionality, see the code example in the
C++\Code Examples\Modelling\LOP\Bending
folder, located in
example_applications
in your Parasolid installation folder.
You need to supply the following data for each set of faces you are patching using PK_FACE_change:
sheet |
A set of faces to use as replacement faces for the specified faces. This can either be a sheet body or a shell of connected faces from a solid or sheet body. |
Figure 72-5 shows an example of a face change operation in which a set of faces in a body are patched at the same time as a bend operation is performed.
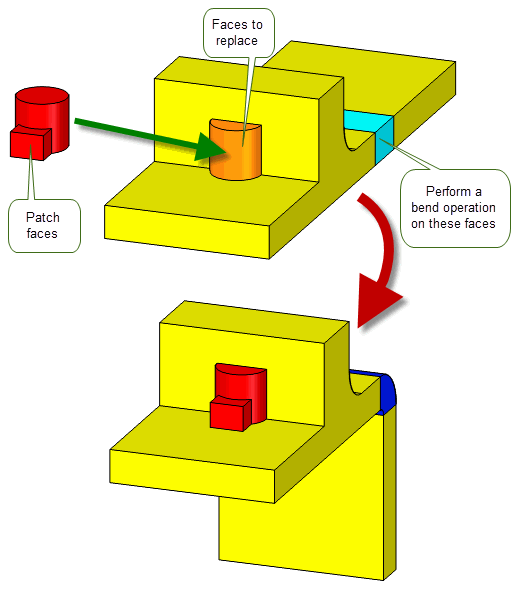
Figure 72-5 Patching faces during a face change operation
Generally, the replacement faces need to be at least as large as the original faces. However, you can supply a smaller set of replacement faces if the replacement faces imprint exactly onto the originals, such that one end of the set of original faces is split off, creating a boundary that needs to be healed. Figure 72-6 shows an example in which two through holes (a total of four faces) have been replaced by two shorter blind holes (a total of six faces), while other faces in the body have been tapered during the same call to PK_FACE_change.
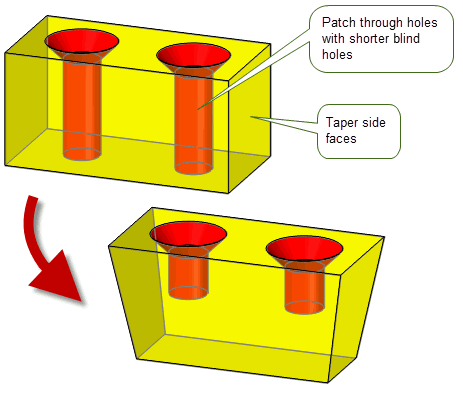
Figure 72-6 Patching faces using smaller replacement faces
In addition, the supplied faces must have no laminar edges, unless those faces form part of the
patch_data
associated with the patch operation. See Section 72.4.7, “Patch options”, for more information.
Note: In order to take advantage of this behaviour, you must supply
patch_data
. See Section 72.4.7, “Patch options”, for more information. |
Note: Faces to be patched by the supplied
sheet
can only be adjacent to faces that have blend operations applied to them in the same call to PK_FACE_change if any of the following is true:
See Section 72.4.7, “Patch options”, for more information about supplying
patch_data
for the patch operation. |
PK_FACE_change allows you to perform arbitrary deformation of a set of target faces in a body by providing you with the ability to call an evaluator function that you provide in your own application code. This powerful functionality allows you to perform sophisticated manipulations to a body while retaining the ability to automatically reapply blends, preserve dependent offsets, and so on.
For examples of this functionality, see the code examples in the
C++\Code Examples\Modelling\LOP\Global
Deformation
folder, located in
example_applications
in your Parasolid installation folder.
Figure 72-7 shows an example in which the side faces of an open box have been deformed by applying a twist and non-linear scale. A number of blends on the inside of the box are automatically recalculated as part of the call to PK_FACE_change.
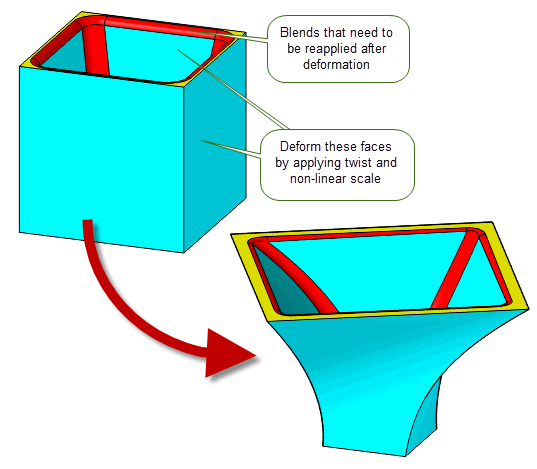
Figure 72-7 Deforming faces in a body
In order to perform deformations such as this, you need to supply one of the following:
The PK_FACE_change_data_deform_t structure has the following fields:
eval_fn |
An evaluator function that describes how a supplied face is to be deformed. Note: If the
eval_expr
option in PK_FACE_change_deform_o_t structure is supplied, this field must be set to NULL. |
eval_data |
The supplied
eval_fn
receives the following arguments:
position |
|
face |
|
have_params params |
If available, the corresponding surface parameters for the supplied position may be supplied in |
external_data |
A pointer to any external data required by the function. This data is supplied to Parasolid via the |
The supplied
eval_fn
returns the corresponding deformed position using the
deformed_position
argument. For all points shared by several faces (e.g. on edges between adjacent faces), the function must return the same
deformed_position
for a given
position
, regardless of the
face
supplied: the face and surface parameters are merely provided to potentially improve performance, rather than affect the result.
PK_FACE_change supports a number of options that let you control how the deformation operation behaves. These are described in Section 72.4.8, “Deformation options”.
If a deform operation fails but some surfaces were successfully created, these surfaces will be reported in the Parasolid Report. This report is of
type
PK_REPORT_record_type_1_c, which contains the following information:
status |
This has the value PK_REPORT_1_deform_surf_c. |
|
|
|
B-surfaces successfully created by the operation prior to the failure. |
You need to supply the following data for each face you are radially displacing using PK_FACE_change:
|
Each point on the surface of the face is displaced radially by this amount. |
PK_FACE_change supports a number of options that let you control how the radiate operation works. These are described in Section 72.4.9, “Radiate options”.
The
op_opts
field (PK_FACE_change_opts_t) in PK_FACE_change_t contains options specific to individual operations. It is a union of all data specified in the options structures it contains. There is one options structure for each operation that PK_FACE_change can perform.
Note: Do not confuse these options with those described in Section 72.5, “Specifying options”.
|
The following offset-specific options are available in PK_FACE_change_offset_o_t:
offset_methods |
The offset method used. This can be one of:
See Section 58.3, “Removing self-intersections” for information on the use of this option. |
offset_steps |
Control whether step faces are created along smooth boundary edges. The default is PK_offset_step_no_c. See Section 58.5, “Creating offset steps” for information on the use of this option. See Section 72.4.3.2, “Creating step faces when performing rotations or translations” if you want to avoid creating step faces along smooth boundary edges in cases where adjacent faces can be extended. |
references |
A reference face from which to measure the offset distance. The default is PK_ENTITY_null. If you supply a
The supplied |
ref_alignment |
Control the orientation of faces that are offset with respect to the reference face. This can take one of the following values:
This option can only be used when |
Figure 72-8 shows an example in which the outside faces (shown in orange) of a pocket-like body have been tapered, and the inside faces (shown in red) have been offset dependently, so as to create the correct body in a single operation.
In order to achieve this, the red faces are specified as offset faces, and the orange faces are specified as
reference
faces (as well as being specified as taper faces, in order to achieve the taper). Each dependent offset needs to be specified using a separate operation: in this case, three offset operations should be specified, one for each supplied reference face.
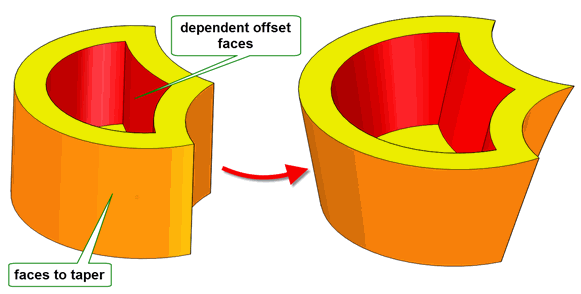
Figure 72-8 Creating dependent offsets by specifying offset reference faces
Figure 72-9 illustrates how dependent offsets behave when patch operations are used to replace a single face with several faces. If the outer face of the dome is supplied as the
reference
for the inner face of the dome, then, when that outer face is replaced with several faces using the patch operation (see Section 72.3.7), the dependent offset face is replaced with multiple offset faces.
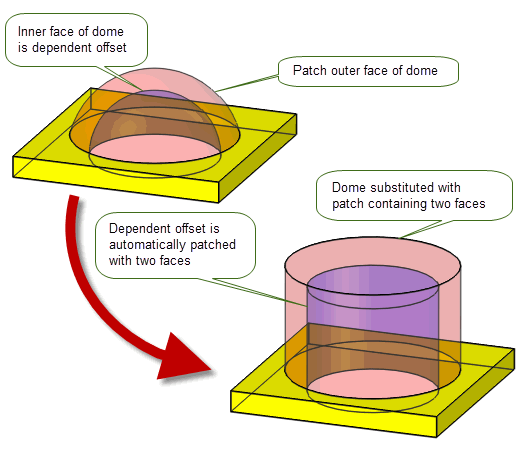
Figure 72-9 Behaviour of dependent offsets when supplying multiple face patch data
Figure 72-10 illustrates how you can control the alignment of dependent offset faces using the
ref_alignment
option. The model has one reference face in red and two offset faces in teal (one is behind the reference face and hidden from view). The visible offset face is aligned in the same direction as the reference face (the face normals are in the same direction), so
ref_alignment
is set to PK_ref_alignment_aligned_c. The offset face hidden behind the reference face is aligned in the opposite direction to the reference face (the face normals are in the opposite direction), so
ref_alignment
is set to PK_ref_alignment_opposed_c. When the reference face undergoes a rotation transformation, the transformed surface is then used to produce new surfaces for the dependent offset faces. This shows an example where the dependent offsets match the original offset distance.
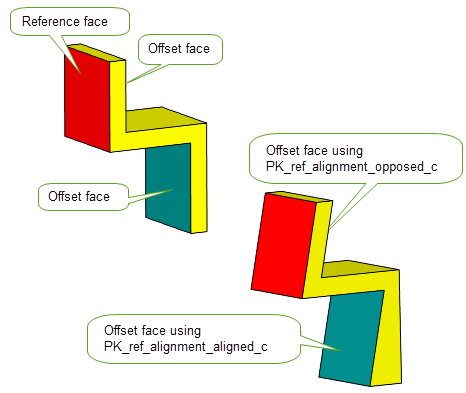
Figure 72-10 Controlling the alignment of dependent offset faces
The following taper-specific options are available in PK_FACE_change_taper_o_t:
tapered_edges |
The edges from which tapered step faces are created. The surfaces on which these edges lie satisfy the taper condition. Edges that appear in this array should
not also appear in the |
normal_edges |
The edges from which normal step faces are created. The surfaces on which these edges lie do not necessarily satisfy the taper condition. Edges that appear in this array should
not appear in the |
method |
The tapering method used. This can be one of:
The default is PK_method_curve_c. See Section 66.3, “Taper methods” for more detail. |
taper_smooth_step |
Automatically create side faces at edges between taper faces and non-taper faces that are smooth. See Section 66.4.2, “Automatic step tapering”, for more details. |
taper_step_face |
Control the creation of step faces between taper faces that become separated as a result of the taper operation. See Section 66.4.3, “Creating steps between taper faces”, for more details. |
position |
Control the position of laminar edges on tapered faces. See Section 66.6, “Controlling laminar edges”, for more details. |
parting_edges |
Edges that are used to create step faces from |
n_parting_edges |
Number of |
parting_body |
The body used to create step faces from the parting edges. This must be a sheet body. Default is PK_ENTITY_null. See Section 66.4.4, “Creating step faces from a parting body”, for more details. |
For more information about creating tapered surfaces, see Section 64.2, “Adding draft”.
The following transform-specific options are available in PK_FACE_change_transform_o_t:
n_loops |
The number of boundary loops contained in the feature. (Default 0). See Section 72.4.3.1, “Specifying the destination for boundary loops”. |
base_loops |
The boundary loops of the feature. (Default NULL). See Section 72.4.3.1, “Specifying the destination for boundary loops”. |
target_faces |
The destination face of each boundary loop. (Default NULL). See Section 72.4.3.1, “Specifying the destination for boundary loops”. |
transform_step |
Whether to create step faces when performing rotation or translation transforms. See Section 72.4.3.2, “Creating step faces when performing rotations or translations” for more information. |
transform_intent |
Whether the rotation will add material, remove material, or produce the minimal rotation. Default: PK_transform_intent_minimal_c. See Section 72.4.3.3, “Choosing the direction of a rotational transform”. |
The
base_loops
and
target_faces
options enable you to efficiently transform the set of faces (the “feature”) supplied in the
faces
array such that the boundary loops of the feature move out of their original face. These loops are given in the
base_loops
array and the corresponding destination faces in the
target_faces
array. The effect is the same as for patterning to a different face (see Section 54.3.5, “General patterning”), and the options work in exactly the same way, except for the fact that the feature is
moved (transformed)
rather than copied (therefore only a single new instance of the feature is created).
As mentioned in Section 54.3.5, “General patterning”, these options should not be specified if the target faces are not known beforehand or the new instances might cross existing edges. In these cases, Parasolid can still carry out the operation but the performance may not be optimal (since Parasolid would need to calculate the target_faces internally).
Figure 72-11 shows an example of a feature that constitutes a hollow cylinder through the solid, with boundary loops on two faces as shown in the diagram. The base_loops array contains two boundary loops and the target_faces array two destination faces as shown. The corresponding new instance is shown on the right-hand side. For comparison, see Figure 72-11 of Section 54.3.5, “General patterning”.
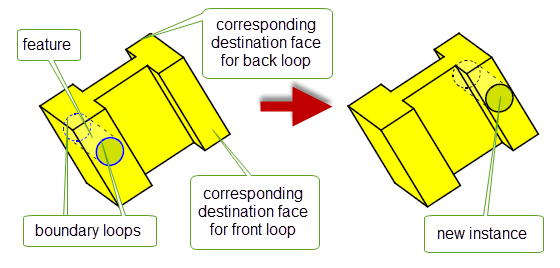
Figure 72-11 New instance lies in different faces than the original feature and transformed boundary loops are not coincident with their destination faces
Figure 72-12 shows a sheet body where the new instance of the feature crosses the boundary of the target body. In this case, the
target_faces
are not known, and
n_loops
and
base_loops
should not be set.
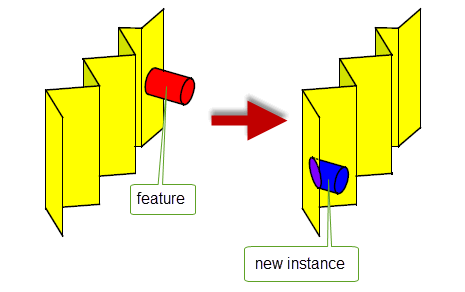
Figure 72-12 New instance crosses existing edges: transform-specific options are not specified
The
transform_step
option lets you control whether PK_FACE_change creates step faces when performing rotations or translations.
Figure 72-13 shows two examples of this behaviour. In the first example, a face is translated along the direction shown, thereby creating a side face. In the second, more complex, example, a set of faces are rotated, thereby creating a set of side faces, as well as reblending a chain of blend faces.
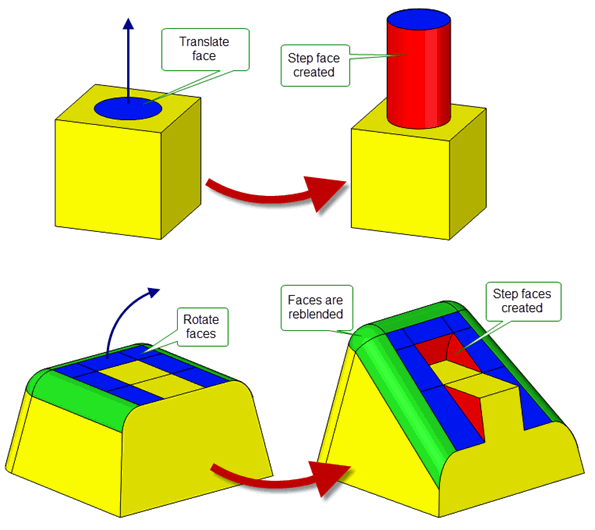
Figure 72-13 Creating step faces during translation and rotation operations
The
transform_step
option takes the following values:
Figure 72-14 shows the effect of using PK_transform_step_not_coi_c to specify that step faces should only be created at boundary edges where the surfaces of the step face and the adjacent face are not coincident.
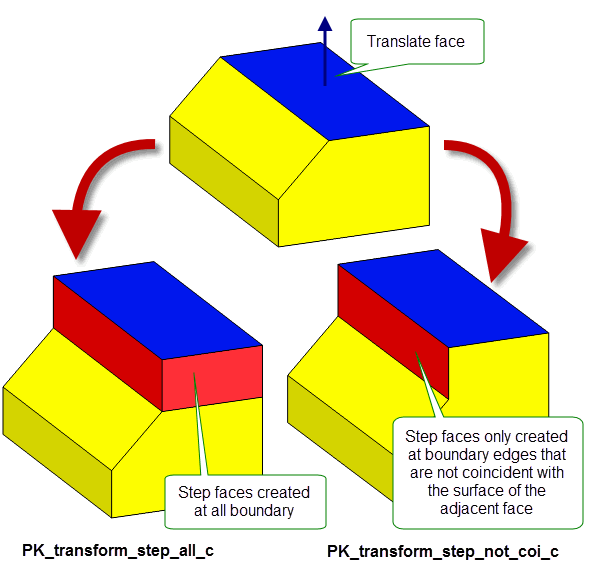
Figure 72-14 Creating step faces at all non-coincident boundary edges
You can also choose to avoid creating step faces at any smooth boundary edges where faces on either end of the boundary edge can be extended and merged (PK_transform_step_smooth_site_c). These neighboring faces, called site faces, need to;
However, if the shared smooth boundary edge is not mergeable and it does not lie on the surface of the site faces, then a step face will be created.
Figure 72-15 shows how PK_transform_step_smooth_site_c can be used to avoid the creation of step faces when the site faces are coincident
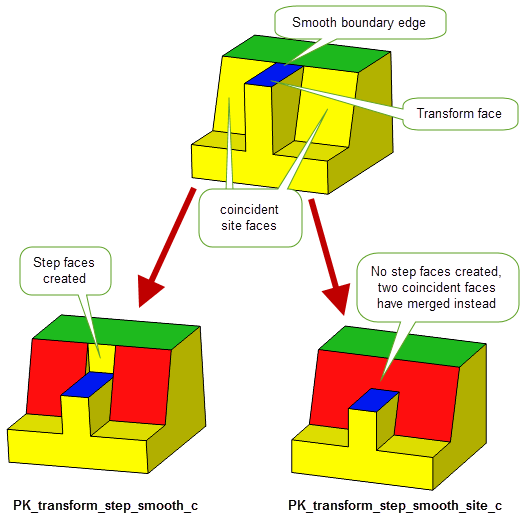
Figure 72-15 Using PK_transform_step_smooth_site_c with coincident site faces
If you use PK_transform_step_smooth_site_c and the site faces are not coincident, then a step face will be created. This is the same behaviour as PK_transform_step_smooth_c. Figure 72-16 illustrates this behaviour.
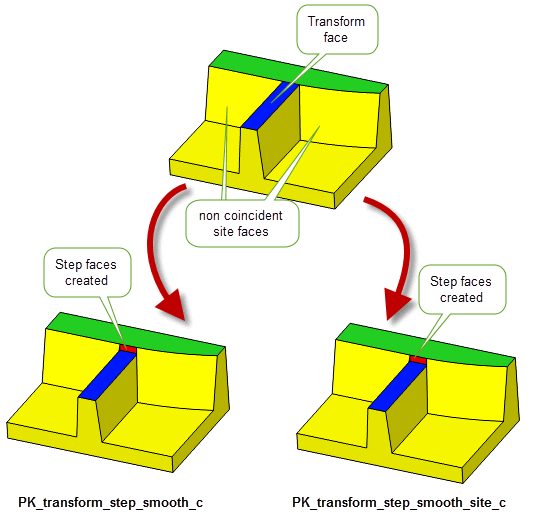
Figure 72-16 Creation of step faces with non coincident site faces
The
transform_step
option offers the same behaviour for PK_FACE_change that the
offset_step
options do for offsetting (Chapter 58, “Offsetting”), hollowing (Chapter 59, “Hollowing”), and thickening (Chapter 60, “Thickening”) operations.
If the supplied transformation is a rotation, you can use the
transform_intent
option to choose the direction of the rotation and whether its intent is to add material, remove material, or produce the minimal rotation needed for the transformation. It takes the following values:
Figure 72-17 illustrates the effect of rotating and either growing or trimming a face. When
transform_intent
is set to PK_transform_intent_trim_c, the blue face is rotated 90 degrees in the clockwise direction and material is trimmed.
If the same blue face is rotated 90 degrees in the same direction but its intent is to grow the face (i.e.
transform_intent
is set to PK_transform_intent_grow_c), material is added to the transformation and a complete rotation is produced. In this example setting
transform_intent
to PK_transform_intent_minimal_c will produce the same result as setting the option to PK_transform_intent_trim_c.
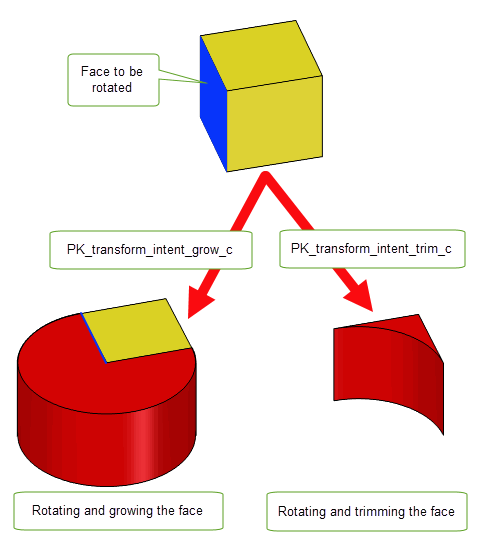
Figure 72-17 The effects of rotating and either growing or trimming a face
The following replace-specific options are available in PK_FACE_change_replace_o_t:
merge |
Control whether Parasolid merges adjacent faces that become mergeable as a result of replacing the surfaces of some faces. See Section 65.2, “Merging adjacent faces”, for more information. By default, faces that become mergeable are not merged automatically. |
variation |
Allows you to perform a variational replacement operation. Typical examples of variational replacement operations include deformations and variable offsets. Performing a variational replacement operation improves regeneration of nearly smooth edges and vertices in the result body. See Section 65.3, “Using variational surfaces to improve regeneration of smooth geometry”, for more information. By default, replacement surfaces are not assumed to be variational surfaces, and so regeneration of smooth geometry is not improved.
Figure 72-18 shows an example in which two surfaces in a body are being replaced, while reblending two chains of blends. Both replacement surfaces are variable offsets of the original surfaces, and so by using the |
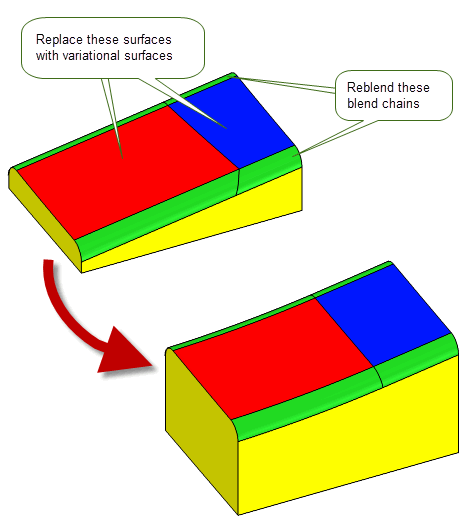
Figure 72-18 Improving nearly smooth geometry using variational replacement surfaces
When you specify a blend operation (see Section 72.2, “Specifying operations”), PK_FACE_change can reapply blends that need to be updated as a result of a generic modelling operation: this is a process often referred to as reblending.
PK_FACE_change can reblend any constant radius rolling ball blend that needs to be updated. All you need to do to achieve this is to supply the faces to be reblended and set their
operations.op_type
to PK_FACE_change_type_blend_c: no further information is required in order to reapply any blends using their original radii.
However, if you want more control over how the reblending takes place, you can supply additional information using the PK_FACE_change_blend_o_t options structure. Supplying such information lets you:
This section tells you how to use these options.
The following table provides a summary of the blend-specific options that are available in PK_FACE_change_blend_o_t:
These options are described in more detail throughout the rest of this section.
By default, rolling ball blends are reapplied without you having to supply any additional information in the call to PK_FACE_change beyond the blend operation itself. However, if you wish, you can use the
radius
option to specify a new radius for the reapplied blend.
If
radius
is 0.0 (the default), then the radius used when reapplying the blend is the same as the radius of the original blend.
By default, PK_FACE_change reblends faces whose surfaces lie within tolerance of a rolling ball blend (i.e. faces that would be returned by PK_FACE_identify_blends).
If you want to reblend a blend-like face that Parasolid doesn’t recognise as a blend (for example if editing a model that has been created to a looser tolerance in a different system), then you must supply the following options:
The way you use these options depends on the type of blend you are reblending:
n_unders
=2, and supply
unders
and
orientations
, together with a
radius
.
n_unders
=3, and supply only
unders
.
Figure 72-21 shows an example using a chamfer.|
Note: When using these options to reblend faces, Parasolid replaces the original faces with a rolling ball blend. |
If you supply sufficient additional information, PK_FACE_change can also reapply chamfers. Figure 72-19 shows two simple examples:
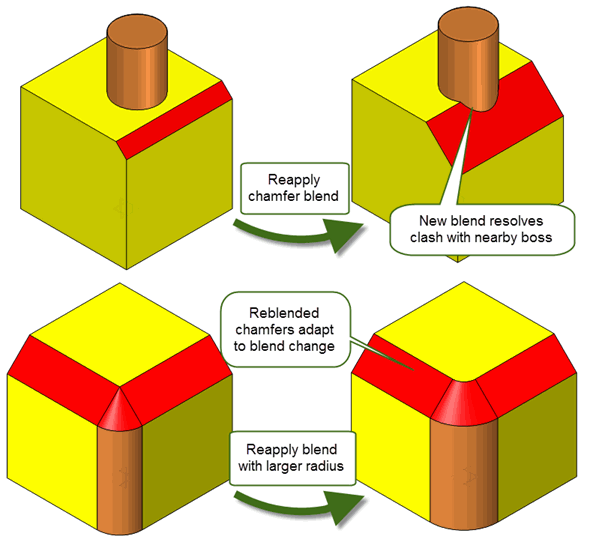
Figure 72-19 Reblending chamfers
To reblend chamfers, you need to supply the underlying faces of the chamfers, together with their orientations, using the
n_unders
,
unders
, and
orientations
options already described, in combination with the following options:
xs_shape |
The cross-section shape of the blend after it has been reapplied. By default, this is PK_blend_xs_shape_conic_c. To reblend a chamfer, set it to PK_blend_xs_shape_chamfer_c. |
ranges |
An array of length |
The way you use these options depends on the type of chamfer you are reblending:
n_unders
=2, and supply
unders
and
orientations
, together with a pair of
ranges
.
n_unders
=3, and supply only
unders
, as shown in
Figure 72-21.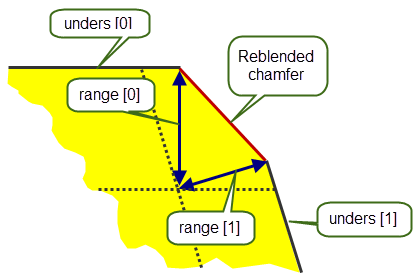
Figure 72-20 Specifying ranges for edge chamfers
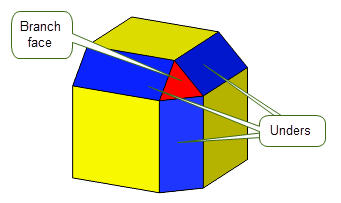
Figure 72-21 Specifying underlying faces for branch face chamfers
Note: It is an error to set
xs_shape
to either PK_blend_xs_shape_g2_c or PK_blend_xs_shape_unset_c. |
You can use the
ov_smooth
option to control how blend overflow when reblending. By default, when a blend overflows a smooth edge, smooth overflow is only possible when the blend face and the face on the other side of the smooth edge have different convexities. If they have the same convexity, then a notch overflow is created instead. This option lets you specify that smooth overflow be used in cases when they have the same convexity as well.
Figure 72-22 shows an example in which a blend has been repositioned such that it overflows a smooth edge. The faces on either side of the smooth edge have the same convexity as the blend face that needs to be recalculated. By default, a notch overflow is created (PK_blend_ov_smooth_diff_c), but by setting
ov_smooth
to PK_blend_ov_smooth_any_c, a smooth overflow can be created.
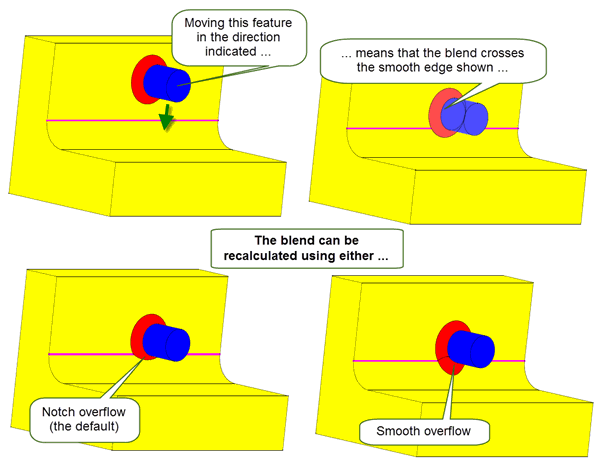
Figure 72-22 Specifying notch or smooth overflow when overflowing smooth edges with the same convexity as the blend
To find out more about blend overflow behaviour, see Chapter 76, “Edge Blend Overflows”.
Note: It is an error to set
ov_smooth
to PK_blend_ov_smooth_no_c. This value is reserved for edge blend functionality. |
The constraints on when reblend options may be combined are moderately complex. If you have a problem with bad option combinations, please refer to this list of invalid combinations of options:
n_unders
> 0 and no
unders
have been supplied.
n_unders
= 2 and no
orientations
have been supplied.
n_unders
= 2 and neither
radius
nor
ranges
have been supplied.
n_unders
= 3 and
radius
not set to 0.0,
ranges
or
orientations
not set to NULL.
xs_shape
set to PK_blend_xs_shape_chamfer_c but no
unders
have been supplied.
xs_shape
set to PK_blend_xs_shape_chamfer_c and
radius
not set to 0.0.
xs_shape
set to PK_blend_xs_shape_conic_c and
ranges
not set to NULL.
n_unders
= 3 and not all members of
unders
are being reapplied as blends/chamfers with their
xs_shape
set to same value as
xs_shape
.The following bend-specific option is available in PK_FACE_change_bend_o_t:
merge |
Whether to merge faces that become mergeable as a result of a bend operation. Three settings are possible:
|
The following patch-specific options are available in PK_FACE_change_patch_o_t:
patch_data |
A structure that lets you explicitly map faces in the supplied |
mobility |
Whether to treat patch faces as fixed or moving faces when resolving clashes with other parts of the model. This lets you control whether or not patch faces are extended to resolve clashes, depending on the value of the |
Patch faces supplied to PK_FACE_change are introduced into the model in their supplied positions. If these new faces clash with other areas of the model, they are treated in the same way as faces that have not moved when using the
grow
option (described in Section 72.5.5), because they are not part of the original body. This has an effect on whether or not they can be extended in order to resolve the clashes.
Because the patch faces replace input faces in the call to PK_FACE_change, this default behaviour might not always be convenient; you might want to treat patch faces as moving faces instead, so as to produce behaviour similar to what would be seen if an operation other than patching had been applied to the input faces.
You can use the patch-specific
mobility
option to perform this task. This takes the following values:
The exact behaviour of the mobility option (i.e., whether patch faces are extended, or whether the faces they clash with are extended, in order to resolve the clash) depends on the values of both
mobility
and
grow
, and also how the faces they are clashing with are treated. The following table describes all possible combinations of values.
mobility |
grow |
||
|---|---|---|---|
Note: The
mobility
option only has an effect if the
grow
option is set to PK_FACE_grow_moving_c or PK_FACE_grow_fixed_c. See Section 72.5.5, “Controlling the growth of overflowing faces”, for more information. |
Figure 72-23 shows an example in which a blind hole replaced by a sheet. The resulting new hole clashes with the upright part of the L-shaped block, which is itself treated as fixed. By choosing different values for
mobility
, you can choose whether or not to extend the patch faces into the upright part of the block, or the upright block into the patch faces, as shown.

Figure 72-23 Controlling the growth of patch faces that clash with overflowing features
You can control the behaviour of a deformation operation using the following options, which are available in PK_FACE_change_deform_o_t:
n_matched_edges matched_edges |
You can use the Figure 72-24 shows a simple example in which two faces are deformed using the same evaluator function, while a third face has no operation performed on it. By specifying the unmoving shared edge between these faces as a matched edge, you can improve the reliability of the result. Note: Because of the constraints of the operator used by the
eval_fn
, edges between adjacent faces that use the same
eval_fn
and
eval_data
do not need to be specified as matched edges. |
thread_safe |
Whether or not the supplied
For more information about Parasolid SMP, see Chapter 114, “Symmetric Multi-Processing In Parasolid”. |
deform_uv |
How to determine the range of the original surface that the deformation is evaluated on, and whether to share geometry. This option takes the following values:
|
eval_expr |
Whether to use an expression evaluator instead of a callback function to describe how the input faces should be deformed.
To supply an expression, you need to set the
See Chapter 24, “Expressions” for more information on using expression functions. |
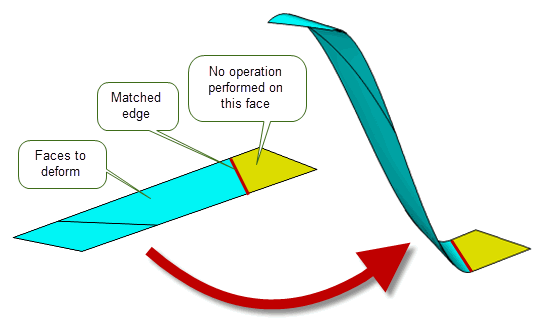
Figure 72-24 Improving reliability by specifying matched edges
You can control the behaviour of a radiate operation using the following options which are available in PK_FACE_change_radiate_o_t:
|
The radiated surface is moved along the supplied |
|
|
Whether to create a radiate step face. Default: PK_radiate_step_no_c. |
Every point on the supplied surface is displaced by the value of
radial_displacement
(see Section 72.3.9 for more information on this option). The radiated surface can be optionally moved along the axis by the value specified in
axial_displacement
. By default,
axial_displacement
is set to 0.0 and the resultant radiated surface is not moved along the supplied axis, as illustrated in
Figure 72-25 (a).
Figure 72-25 (b) illustrates how setting the
axial_displacement
to a value other than the default allows the radiated surface to be moved along the supplied axis.
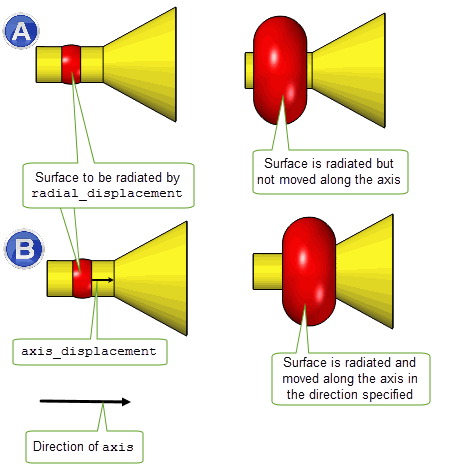
Figure 72-25 Radiating a surface and optionally moving it along a supplied axis
The
radiate_step
option lets you control whether PK_FACE_change creates step faces when performing a radiate operation.
The
radiate_step
option takes the following values:
|
Create step faces at all smooth boundary edges as shown in Figure 72-26. |
|
|
Only create step faces at smooth boundary edges, if it cannot be done by growing the faces on either end of the boundary edges. |
|
|
Create step faces at boundary edges where the surface of the step face is not coincident with the surface of the adjacent face. |
|
|
Create step faces at all boundary edges as shown in Figure 72-26. |
A boundary edge is an edge between a face which is being radiated and one which is not, or between two faces being radiated differently.
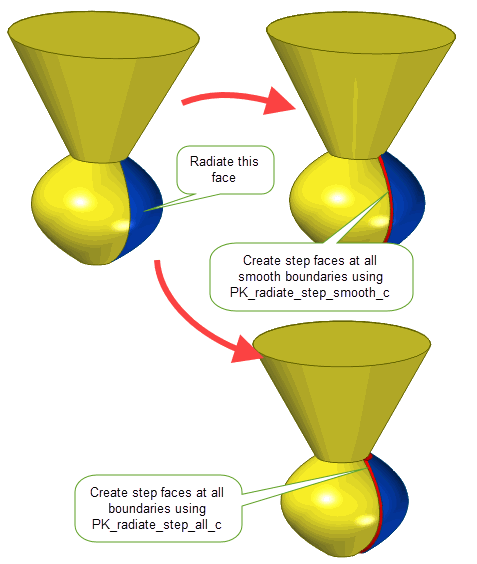
Figure 72-26 Creating step faces when performing a radiate operation
Various combinations of operations are possible using PK_FACE_change and the effects may differ depending on the options used.
An example of this is shown in
Figure 72-27, where a call to PK_FACE_change involves a single face supplied for offsetting (with
offset_step
set to PK_offset_step_yes_c) and another (above the offset face) for reblending. Two step faces are introduced along the smooth edges between the
moving faces (the offset and blend faces indicated in the diagram) and the adjacent
stationary faces. This operation would fail if
offset_step
were left at PK_offset_step_no_c because the surrounding faces could not be extended to cover the hole (they are all orthogonal to it).
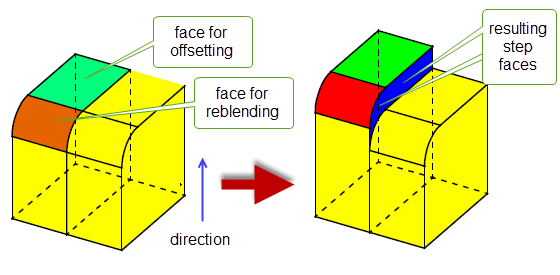
Figure 72-27 Combination of offsetting and reblending in a single call to PK_FACE_change
You can set a number of options for PK_FACE_change using the PK_FACE_change_o_t option structure. Unlike the options described in Section 72.4, “Operation-specific options”, the options described in this section apply to all the operations specified in the call to PK_FACE_change. The options available are described below.
merge_face |
If this is PK_LOGICAL_true, then any new faces created by the call are merged with their neighbors, if this is possible. |
allow_disjoint |
|
check_fa_fa |
Whether to check for face-face inconsistencies. See Section 72.5.6, “Repairing face-face inconsistencies”, for more information. Default: PK_check_fa_fa_yes_c. |
edge_geom_data |
Structure containing data that controls the geometry you want edges to have after any modeling operations specified in the call. Any edge that is adjacent to a modified face that is not in this array will have its geometry recalculated. See Section 72.5.1, “Controlling the geometry of edges in the body”. |
edge_data |
Performs a similar role to |
vertex_data |
Structure containing the geometry that you want the vertex to have after any modeling operations specified in the call. Any vertex that is adjacent to a modified face that is not in this array will have its geometry recalculated. See Section 72.5.2, “Retaining vertices in the body”. |
edge_help |
Structure containing edge geometry that is used in cases where the change operation results in multiple possible solutions. If several outcomes are possible, the one with the closest curve to the supplied geometry is chosen. See Section 72.5.3, “Dealing with multiple solutions”. |
vertex_help |
Structure containing vertex geometry that is used in cases where the change operation results in multiple possible solutions. If several outcomes are possible, the one with the closest point to the supplied geometry is chosen. See Section 72.5.3, “Dealing with multiple solutions”. |
replace_update |
This option has been replaced by the |
update |
Update switch to maintain consistency when rebuilding models built in older versions of Parasolid. See Section 62.5.2, “Update control”, for information. Default: PK_local_ops_update_default_c. |
adjacency |
When performing operations on a body, whether to maintain the adjacency between faces, or change the topology such that new faces are adjacent to each other. See Section 72.5.4, “Controlling face adjacency”, for more information. |
grow grow_data grow_cb |
When features with different convexities overflow each other as a result of model editing, you can control which of the clashing features is grown to heal the model. See Section 72.5.5, “Controlling the growth of overflowing faces”, for more information. |
vertex_limit edge_limit |
How to constrain the maximum tolerance used by each vertex or edge, as appropriate. This is identical functionality to that available in Parasolid’s offsetting operations. See Section 58.10, “Constraining edge and vertex tolerance when offsetting”, for more details. |
repair_fa_fa |
Whether to repair face inconsistencies identified by the Default: PK_repair_fa_fa_no_c. |
repair_fa |
Whether to repair any face inconsistencies. See Section 72.5.7, “Repairing invalid faces”, for more information. Default: PK_repair_fa_yes_c |
trim_data trim_cb |
Used in conjunction with |
report_surf_extension |
Whether to record information on the surfaces that were extended during the operation. If this is PK_LOGICAL_true, then the Parasolid report stream contains a record of type PK_REPORT_record_type_3_c. This has a status of PK_REPORT_3_surf_extended_c and contains information on the surfaces that were extended. See Chapter 11, “Using Reports”, for more information on the Parasolid report mechanism. See the documentation for PK_REPORT_3_t for details of the information recorded when this option is PK_LOGICAL_true. |
track_edges |
Whether to track new laminar edges that are created as a result of the face change operation. See Section 72.5.8, “Tracking laminar edges”, for more information. Default: PK_change_track_edges_no_c. |
results_output |
Whether the results of the function are output as a returned argument or through the Parasolid Report. See Section 72.5.9, “Reporting function results”. Default: PK_results_output_return_c. |
You can control the geometry created for edges during a face change operation. To do this, you can supply a curve for the edge that is required in the result body. If supplying this curve is not straightforward, and the edge is laminar, you can supply a surface or face that you know the curve must lie in.
|
Note: When supplying a face or surface, this must not be the face that the laminar edge already lies in, or the surface of that face. |
You can use the
edge_geom_data
field in PK_FACE_change_o_t to control the geometry of the associated edges after a face change operation.
Note: In general, PK_FACE_change can create mixed edges on a face that is changing. However, edges that will be mixed after the operation must be supplied in
edge_geom_data
if any adjacent face which is being changed has a bend operation. |
This structure has the following fields:
n_edge_arrays edge_arrays |
Arrays of edges for which you are providing the data to control the geometry created in the result body. |
entities |
An array of entities to use when defining the curves attached to the associated array of edges. Each individual entity can either be a curve, a surface, a face, or PK_ENTITY_null.
|
methods |
An array of PK_change_edge_method_t values that determines the method for controlling the geometry of the corresponding edges. The default is NULL indicating that See Section 72.5.1.1, “Controlling edge or step face geometry using the methods option” for more information. |
steps |
An array used to control the creation of step faces for specific edges. The default is NULL, indicating that the operation will use PK_EDGE_step_default_c and the data is only used to control the geometry of the edge. See Section 72.5.1.2, “Controlling the creation of step faces using the steps option” for more information. |
directions |
An array defining the sweep direction if |
reversals |
An array of PK_LOGICAL_t values that indicates whether the direction of the associated arrays of edges should be reversed. The default is NULL, indicating that no edges are reversed. See the PK Reference documentation for PK_change_edge_geom_data_t for more information. |
offsets |
An array of signed distances that indicates the distance to offset each corresponding entity in The default is NULL, indicating that no entities or swept surfaces should be offset.
See the PK Reference documentation for PK_change_edge_geom_data_t for information on how this option is used with |
transforms |
An array of transforms to be used on the corresponding entities. Scaling, shearing, perspective, and reflection components are not allowed in the transforms. The default is NULL, indicating that no entities are to be transformed.
See the PK Reference documentation for PK_change_edge_geom_data_t for information on how this option is used with |
tolerances |
An array of tolerances associated with the corresponding edges in the
The default is NULL, indicating that original tolerances should be used for all edges. Note: Edges which will be mixed after the operation must have a tolerance of at least 5 times the session precision. For such edges, you must supply tolerances of at least that amount. |
replace_uses |
An array of PK_replace_use_t values that controls behaviour when the specified entity cannot be used as required. This option is used in the following circumstances:
You can set
|
Figure 72-28 shows two examples where edges can be retained by specifying a suitable surface or face.
The first example shows an open sheet body with a hole in the bottom face that has been cut using a cylindrical surface. If the bottom face of the sheet is replaced with a new surface, the laminar edge around the hole can be retained in the result body by passing the cylindrical surface that the edge lies in as the entity to use.
The second example is a more complicated example that shows the behaviour when a cylindrical face (shown in green) is transformed, while at the same time replacing another face (shown in red), where the geometry of the laminar edge of the cylinder and the hole in the replaced face are dependent on each other.
To achieve this effect five arrays of edges are passed to
edge_arrays
, with associated additional information as described:
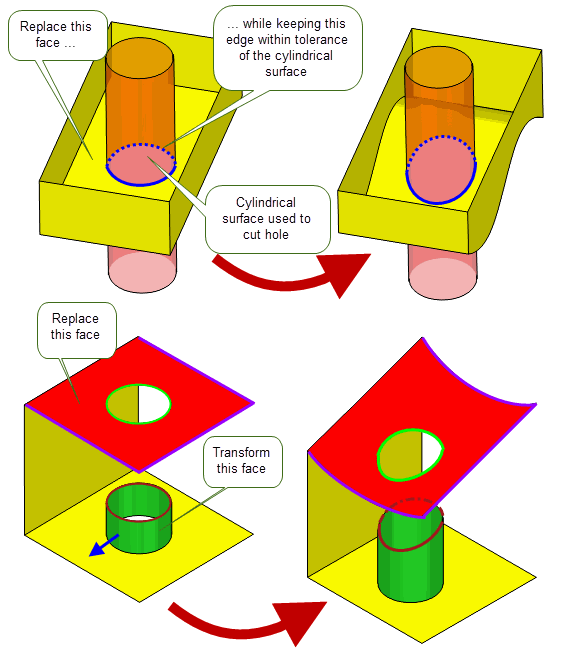
Figure 72-28 Retaining edges in a body by specifying a surface
You can use the
methods
option to control the geometry of the corresponding edges as described in this section. It takes the following values:
|
Try to use the supplied entity from |
|
|
The supplied entity or existing edge curve should be swept in the direction specified by |
|
|
The existing edge curve should be swept along the normals of the original face to generate a ruled surface, as illustrated in Figure 72-29. Any offset or transformation operations are applied to the swept surface before it is intersected to form the new edge geometry. |
|
|
The existing edge curve or the supplied entity should be projected onto the corresponding new face along the normals of the new face, as illustrated in Figure 72-29. Any transformation operations are applied to the edge curve or supplied entity before they are projected. Note: Offset operations cannot be used with PK_change_edge_method_proj_c. |
The
methods
option can also be used to control the geometry of any associated step faces if the
steps
option is set to PK_EDGE_step_method_c. See Section 72.5.1.2, “Controlling the creation of step faces using the steps option” for more information.
Note: If the
methods
option is anything other than PK_change_edge_method_entity_c, the associated edges must be laminar unless a step face is requested by the associated
steps
option. |

Figure 72-29 Controlling edge geometry using the
methods
option
The
steps
option is used to control the creation of step faces for corresponding edges. It takes the following values:
|
Do not create a step face for the associated edges. Figure 72-30 shows an example of this where a specified face is offset and no step face is created for its associated edge. |
|
|
Create a step face along the associated edges with Parasolid creating the step face surface geometry. An example of this is shown in Figure 72-30, where a specified face is tapered and a step face is created. |
|
|
Create a step face along the associated edges with surface creation from the corresponding |
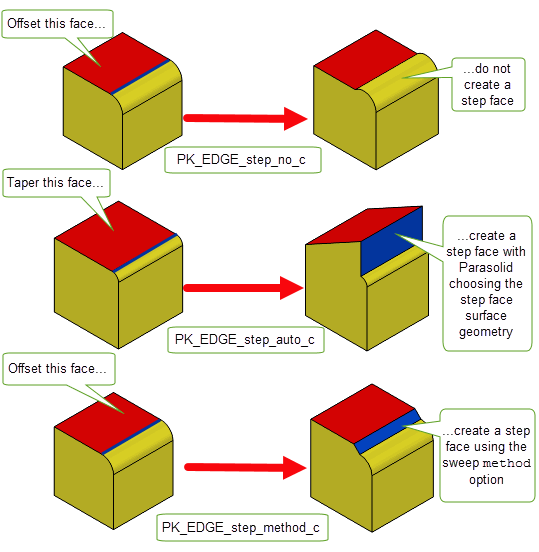
Figure 72-30 Controlling edge geometry using the
steps
option
If you have vertex data that you want to ensure is present in a body after a face change operation, you can use the
vertex_data
field. This field takes the information shown below. The default values for this type are such that no vertex data is specified for the body.
Sometimes a series of modeling operations yields a number of possible different solutions. You can force Parasolid to choose a particular solution by specifying help geometry to use with the topological entities that are ambiguous. The solution that is chosen is the one whose topology has attached geometry that is closest to the supplied geometry.
For PK_FACE_change, help geometry is supplied using the
edge_help
and
vertex_help
fields in PK_FACE_change_o_t. Both these fields are of the type PK_replace_help_points_t, and take the information described below:
By default, Parasolid attempts to keep the same faces adjacent to one another after an operation wherever possible, for example by extending those faces where appropriate. There may be times, however, when this does not provide the most desirable solution. You can use the
adjacency
option (PK_FACE_prefer_adj_t) to control this, by setting it as follows:
Note: The
adjacency
option is currently limited to transformation operations. It does not control trimming of faces for other operations in PK_FACE_change. |
Figure 72-31 shows an example in which a boss is translated on a graduated block. By default, several faces are extended to ensure that they remain adjacent to one another after the operation. However, the resulting body may not be the desired solution. Instead, setting
adjacency
to PK_FACE_prefer_adj_change_c can produce the alternative solution shown.
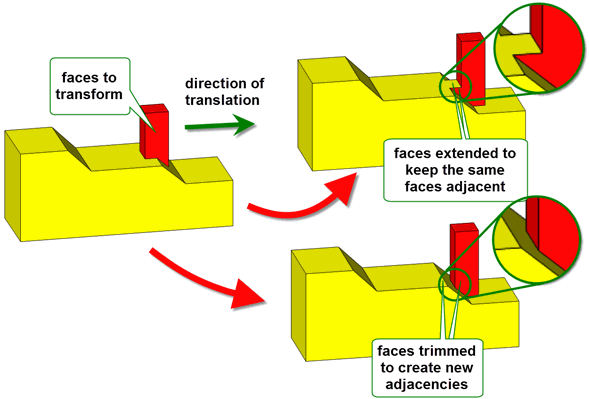
Figure 72-31 Changing face adjacency when translating a boss on a block
Note: The
adjacency
option is also available when transforming faces using PK_FACE_transform_2. |
When features with different convexities overflow each other as a result of model editing, you can control which of the clashing features is grown to heal the model using the
grow
option.
Figure 72-32 shows a simple example that illustrates the main values you can specify for this option. In this example, a single face is offset in the direction shown such that it overflows another face of opposite convexity. Three results are possible:
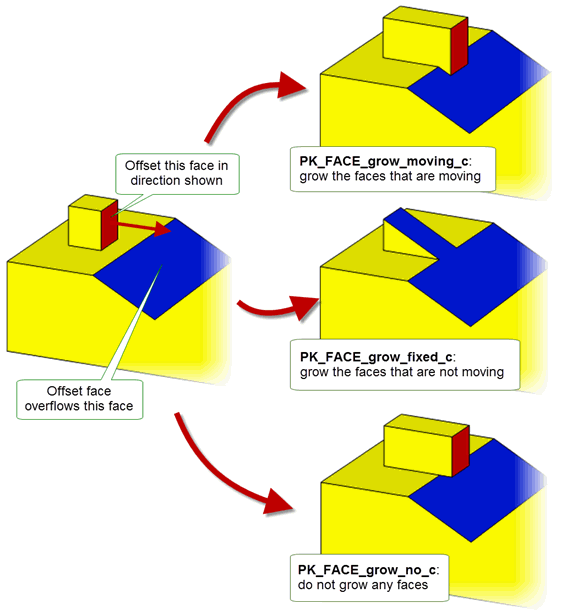
Figure 72-32 Controlling the growth of overflowing features with different convexity
In addition, you can specify a number of other values for the
grow
option, although these do not produce different results to the three values illustrated in
Figure 72-32:
|
Let Parasolid determine automatically which set of faces should be grown in the context of your application, based on which faces are changing. This is particularly useful if two sets of faces are changing as a result of the PK_FACE_change operation. If you specify PK_FACE_grow_moving_c or PK_FACE_grow_fixed_c and faces from both sides of the clash have moved, this option is used automatically.
When using this value, a report is produced via the Parasolid reporting mechanism that documents what decisions were made for those overflows where the automatic behaviour was used. These decisions are represented using |
|
|
Use this value if you are updating a model created in an older version of Parasolid and you want to guarantee identical results. This is the default value. |
|
|
Do not attempt to heal the model: fail the operation instead. |
For any specified value of
grow
, you can override Parasolid’s behaviour by defining your own criteria. By doing this, for example, you could ensure that only faces that have a particular attribute are grown, or you could always grow the set of faces with the largest surface area. You do this by supplying a callback function to be invoked by PK_FACE_change, together with any data required by that callback function.
If a callback returns a
grow
value other than PK_FACE_grow_cb_auto_c, no report record is produced for that overflow.
You can define a callback function and any relevant data using the following fields in PK_FACE_change_o_t:
grow_data |
A pointer to additional data to be used by your callback function. This data is passed into the callback function via the |
grow_cb |
A callback function of type PK_FACE_grow_cb_f_t. This is described below |
The
grow_cb
callback function contain the following arguments:
faces1 |
An array of faces that represents the first set of clashing faces in the model. |
faces2 |
An array of faces that represents the second set of clashing faces in the model. |
site |
An array of faces that represents the faces on which the |
context |
|
grow |
A field used to hold the return value of your callback function. This value is used by PK_FACE_change to determine how the faces in
grow
option originally specified in the call to PK_FACE_change, or PK_FACE_grow_cb_auto_c to use Parasolid’s automatic grow behaviour. This allows you to use Parasolid’s behaviour as a fallback strategy, in cases where your own criteria cannot determine a suitable grow method. |
Figure 72-33 shows how the
faces1
,
faces2
, and
site
arrays are identified using the same example body as shown in
Figure 72-32. Note that the
faces1
and
faces2
arrays are interchangeable.
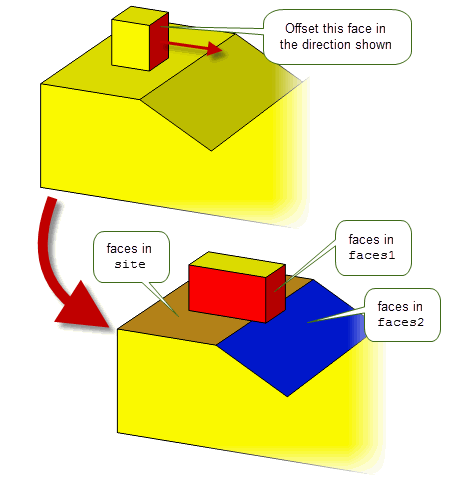
Figure 72-33 Identifying data for overflow grow callback functions
You can use the
trim_data
and
trim_cb
fields, along with the
grow_data
and
grow_cb
fields in PK_FACE_change_o_t to preserve areas of the model that might be altered as a result of resolving a clash. Unlike
grow_data
and
grow_cb
, which are primarily for resolving clashes between faces with different convexity,
trim_data
and
trim_cb
are primarily used for resolving clashes between faces of the same convexity.
This can be useful if there is a particular area in the model that you do not want to be altered by the operation. When a face or faces from that area appear in a callback, you can ask Parasolid to fail the operation rather than resolving the clash and altering the area.
Figure 72-34 shows an example in which a face (shown in red) is offset until it clashes with another face of the same convexity. Depending on the return value of the callback, you can either choose to resolve the clash automatically, as shown in the illustration, or fail the operation completely.
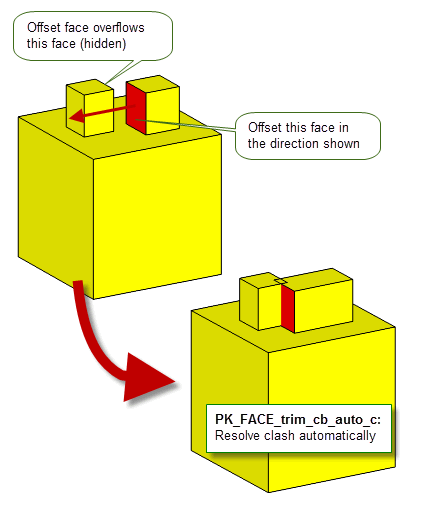
Figure 72-34 Resolving clashes between faces of the same convexity using callbacks
The
trim_data
and
trim_cb
fields are very similar to the
grow_data
and
grow_cb
fields. You define a callback function using
trim_cb
and specify the data to use with it using
trim_data
:
trim_data |
A pointer to additional data to be used by your callback function. This data is passed into the callback function via the |
trim_cb |
A callback function of type PK_FACE_trim_cb_f_t.
Like
It returns a |
You can use the
repair_fa_fa
option to attempt to repair any face-face inconsistencies that have been identified using the
check_fa_fa
option. Using this option, you can repair clashes between faces whose boundary loops are in different faces.
Figure 72-35 shows two examples where this option can be used. In both examples, faces are moved in such a way that they clash with other faces that do not share the same boundary loops. In the first example, the faces comprise a block, and in the second, the face comprises a through hole. By setting
repair_fa_fa
to PK_repair_fa_fa_yes_c, Parasolid can automatically resolve these clashes as shown.
|
Note: PK_repair_fa_fa_yes_c only supports solid bodies. |
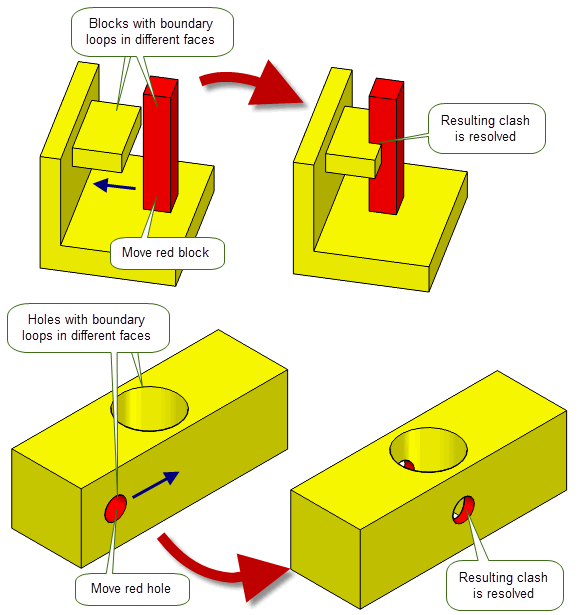
Figure 72-35 Repairing face-face inconsistencies
The default is to check for face-face inconsistencies (PK_check_fa_fa_yes_c), but not to attempt to repair them (PK_repair_fa_fa_no_c).
Warning: It is an error to set
repair_fa_fa
to PK_repair_fa_fa_yes_c if
check_fa_fa
is PK_check_fa_fa_no_c. |
As described in Section 72.5.6, “Repairing face-face inconsistencies”, the
repair_fa_fa
option repairs inconsistencies between faces in a body. The
repair_fa
option repairs inconsistencies within individual faces. It takes the following values:
|
Repairs are performed to ensure faces are valid. Some inconsistencies between faces in a body will also be repaired depending on the values of
|
|
|
Repairs are performed so that only inconsistencies within the individual faces are repaired. Note:
repair_fa_fa
must be PK_repair_fa_fa_no_c when using this value. |
If
repair_fa
is PK_repair_fa_local_c and the orientation of a face is reversed due to the repair, a Parasolid Report of type PK_REPORT_1_t is generated. This report contains the negated faces.
See Chapter 11, “Using Reports”, for more information about the Parasolid Report mechanism.
You can use the
track_edges
option to choose whether or not to track the creation of new laminar edges during a face change operation. If you set
track_edges
to PK_change_track_edges_laminar_c, then laminar edges are tracked and returned in the
tracking.track_records
substructure. By default, laminar edges are not tracked.
When laminar edge tracking is used, a single track record is returned for each group of original topologies that cause a change to the laminar edges of the faces you are operating on. For example:
original_topols
, and edges A, B, and C as the
product_topols
.
original_topols
, and edge A as the
product_topols
.
original_topols
, and edge A as the
product_topols
.
original_topols
and edge B as the
product_topols
.
The value of the
track
field of a given track record depends on the event that caused the track record to be created:
|
A new edge is derived from splitting or merging existing edges on the body. |
|
If a single laminar edge is derived from a single originator then a track record is only created if one of the following is true:
|
Note: Track records are not created when laminar edges are deleted. |
You can use the
results_output
option to choose whether to output any local failures and associated topological entity tags in a Parasolid Report format or in the
results
returned argument of PK_FACE_change.
If
results_output
is PK_results_output_report_c, a complete list of multiple fault types and multiple fault entities within each
type
are returned in the Parasolid Report, unless the returned local status is one of the following:
If the Parasolid Report is populated in this way, PK_FACE_change returns PK_ERROR_failed_to_change.
Each failure reported is saved as a record of type PK_REPORT_record_type_1_c, which contains the following information:
|
The contained value corresponds to the results status that would have been returned if the results were not returned in a Parasolid Report. For example, PK_REPORT_1_cant_get_pt_c is the status value returned with PK_REPORT_record_type_1_t if the geometry for a vertex cannot be located. This corresponds to PK_local_status_cant_get_pt_c, the status value returned by |
|
| <<< Creating New Bodies From Existing Entities | Chapters | Introduction To Blending >>> |