 |
Local Ops: Double-Sided Tapering |
Local Ops: Double-Sided Tapering
| <<< Local Ops: Adding Draft | Chapters | Local Ops: Adding a Vertex to Topology >>> |
The function PK_BODY_taper provides functionality to make it easy to design parted molds.The parting line that separates the two halves of the mold is represented by a sheet body, and is referred to as the parting body. PK_BODY_taper also provides support for the process of adding additional material to faces on the opposing side of the parting line to ensure that they meet with tapered faces at the parting surface. This process is referred to as mitering.
This process is illustrated in Figure 21-1, which shows, in cross-section, a cylinder with an intersecting parting body. In order to be able to draw the cylinder from the mold, only some parts of the cylinder need to be tapered. However, additional material must also be added to those parts that do not require taper, in order to ensure that the faces meet at the parting line.
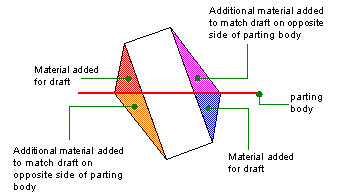
Figure 21-1 Mitering a cylinder that is not perpendicular to the parting body
You can use PK_BODY_taper to automate the creation of tapered surfaces, allowing you to provide "wizard-level" interfaces in your application.
In order to define how to perform double-sided tapering on a body, you need to specify the following tapering information:
Each reference entity identifies an edge in the original body from which the taper will grow. The taper angles and taper methods specify what changes need to be made to each face in order to taper it. This section explains how to use this information to create the taper you require. The reference entities supplied to PK_BODY_taper are preserved during the operation, and are not altered in any way.
A complete list of the parameters and options available in PK_BODY_taper
is given in Section 21.4, "Calling PK_BODY_taper".You can use any sheet body as the parting body in a double-sided taper. It must be large enough to intersect the tapered faces in the final tapered body, though it need not slice through the tapered body completely. The parting body divides the original body into halves "above" and "below" where it intersects the parting body, with respect to the draw direction, as shown in Figure 21-2.
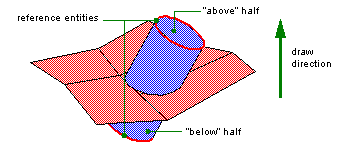
Figure 21-2 Dividing the original body in halves "above" and "below" the parting body
You need to specify a chain of reference entities and an accompanying taper angle for either the side of the body above the parting body, or the side below it, or both.
The reference entities supplied must be edges on the body to be tapered.
The effect of double-sided tapering on a body depends not only on which reference entities you supply, but on whether you miter the taper so that the tapered faces meet at the parting body. Figure 21-3, shows the different effects that you can achieve by tapering a block, and specifying reference edges on either both sides of the parting body, or one side.
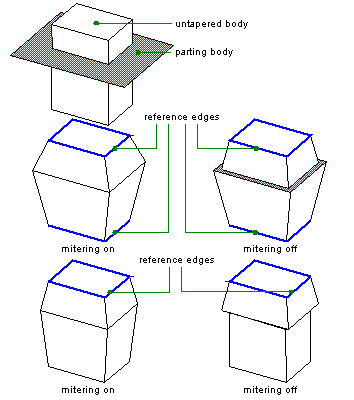
Figure 21-3 The effect of different reference entities and mitering on a body
PK_BODY_taper supports the isocline, curve, and surface taper methods. It does not support offset tapering. The default method is isocline tapering, but you can specify one of the other tapering methods, either for the entire body, or for individual reference entities within the body.
For more information about the differences between isocline, curve, and surface tapering, see Chapter 20, "Local Ops: Adding Draft".
You can use PK_BODY_taper to taper a body from just one direction in a single operation, as shown in Figure 21-4. To do this, you supply the original body as the parting body, and a single set of references and a taper angle. You can supply either references and angles above or references and angles below, and tapering is performed in the appropriate direction.

Figure 21-4 Performing single-sided tapering
PK_BODY_taper receives and returns the following arguments:
| Received | Description |
body |
|
n_refs_above refs_above |
The number of reference entities above the parting body, and the reference entities themselves. |
n_refs_below refs_below |
The number of reference entities below the parting body, and the reference entities themselves. |
parting_body |
The parting body. This body is destroyed by the operation, so long as it is not the same as the |
direction |
|
angle_above angle_below |
The taper angles above and below the parting body, respectively. |
options |
A set of options. See Section 21.4.1, "Taper options". |
| Returned | Description |
tracking |
|
results |
PK_BODY_taper takes a set of options in PK_BODY_taper_o_t. The available options are as follows:
| Option | Description |
|---|---|
tolerance |
|
miter_at_parting |
Whether to miter halves at the parting body. Default: PK_LOGICAL_true. |
merge_face |
Whether tapered faces should be merged with their neighbours. Default: PK_LOGICAL_true. |
check_fa_fa |
Whether to check for face-face inconsistencies. Default: PK_check_fa_fa_yes_c. |
default_method |
Default taper method to use on reference entities not specified in |
n_methods |
Number of reference entities that do not use the specified |
methods |
An array containing tapering methods to use on reference entities instead of the specified |
method_refs |
An array of reference entities for which the |
| <<< Local Ops: Adding Draft | Chapters | Local Ops: Adding a Vertex to Topology >>> |