 |
Local Ops: Adding Draft |
Local Ops: Adding Draft
| <<< Local Ops: Hollowing & Offsetting | Chapters | Local Ops: Double-Sided Tapering >>> |
During both stages, the functionality requires a draw direction vector pointing into the mold and a draft angle.
During this stage of the process PK_FACE_imprint_cus_isoclin is used to create and imprint isocline curves on a set of faces and to report whether the resulting faces are steep. The set of faces must all come from the same body.
Faces are deemed to be steep when, at all points, the face normal makes an angle with the draw direction which is greater than (90 - draft angle);
This stage of the process uses PK_FACE_taper to create isocline surfaces to replace the surfaces of the selected set of faces
PK_FACE_taper requires a reference entity for each face it tapers. The reference entity is used to define the isocline surface. It can be one of the following:
| Entity | Description |
|---|---|
| an edge |
The reference edge stays fixed while the other edges of the face are altered by the addition of draft. When isocline curves have been imprinted during the analysis phase, they are typically used as reference edges in the drafting phase. |
| a face |
This means that the face acquires the same isocline surface as the reference face (see "Example 3:" below). |
| a surface |
The intersection of the face with the reference surface stays fixed. |
If a face's reference entities are a set of edges plus a surface, the required operation is then a step tapering.
The following examples are intended to illustrate the different aspects of this functionality.
Splitting a single face and adding draft to two of the resulting faces
In Figure 20-1 (a) the curved face has been analyzed and split by two isocline curves into three faces of which two need draft. (b) shows the drafting stage complete and illustrates the isocline surfaces meeting the original face smoothly.
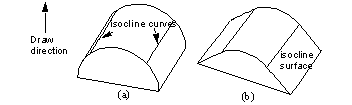
Figure 20-1 Splitting a single face and adding draft to two of the resulting faces
Selecting edges as reference entities
In Figure 20-2 both faces f0 and f1 require draft. In this instance you may identify edges e0 and e1 as the reference entities which both retain their geometry after the draft is applied. In this example the draft surface for face f0 is a plane and for face f1 a ruled B-surface.

Figure 20-2 Selecting edges e0 and e1 as reference entities
Using an adjacent face as the reference entity
In Figure 20-3 two faces (f0 and f1) need drafting. Drafting face f0 modifies edge e0, which means that e0 cannot itself be used as the reference entity for f1.
In this case Parasolid allows the reference entity of f1 to be specified as f0, which in turn means that f1 is to acquire the same isocline surface as f0. Figure 20-3(b) shows the effect of using this specification and since f0 and f1 are adjacent they are merged into one face.

Figure 20-3 Using an adjacent face as the reference entity
Edges to be fixed during drafting
In Figure 20-4 both edges e0 and e1 are required to be fixed during the drafting of face f0. This is achieved by specifying both e0 and e1 as references for f0. The drafted body must then split at the common vertex of e1 and e0 into faces f0 and f1, with each drafted appropriately.

Figure 20-4 Edges e0 and e1 are to be fixed during the drafting of f0
In step tapering, the taper is based on both a reference surface and a parting line of reference edges. The specified faces are tapered in the same way as in regular tapering, but, contrary to regular tapering, these faces are not split into new faces stemming from the reference edges. Any of the reference edges that do not lie in the surface produce a new step face which extends from the reference edge to the tapered face.
A typical example of step tapering is shown in Figure 20-5. The face to taper is marked f0, the reference surface is the plane marked s0 and the reference edges form the parting line. The taper direction is the upward vertical.
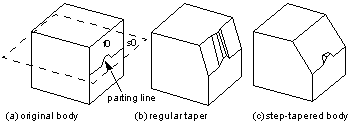
Figure 20-5 parting line of four edges
As in regular tapering, the reference edges, the intersections of the faces to taper and the reference surface, are kept fixed. The reference surface, though, does not have to intersect the faces to taper, as shown in Figure 20-6.

Figure 20-6 Closed parting line of four edges
The reference surface may also split reference edges into new edges as shown in Figure 20-7, leading to the creation of the new-edge associated step faces.
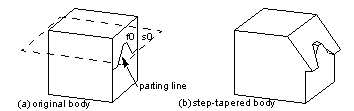
Figure 20-7 Edges of parting line are split
The surfaces attached to the step faces created from reference edges during a step taper operation can be of two types:

Figure 20-8 Step-tapered body with normal step face
Parasolid allows you to create a number of different types of taper:
The
method
field in the options structure for PK_FACE_taper lets you choose which method to use. This field can take the following values:
| Value | Description |
|---|---|
|
This is the default method, and calculates tapered faces with reference to the taper direction and the taper reference curve tangents. It fails if the taper condition is not satisfied. |
|
|
This method calculates tapered faces with reference to the taper direction, the direction perpendicular to the taper direction, and the reference edge's curve tangent. The taper condition does not need to be satisfied for this method to succeed. See Section 20.4.1, "Curve-based and surface-based tapering" |
|
|
This method calculates tapered faces with reference to the taper direction and the normal of the taper faces' original surfaces. The taper condition does not need to be satisfied for this method to succeed. See Section 20.4.1, "Curve-based and surface-based tapering" |
|
|
This method calculates tapered faces by projecting the curve of the reference edge onto the top surface, such that the resulting curve appears offset from the reference edge curve when viewed from the taper direction. See Section 20.4.2, "Offset tapering". |
Curve-based tapering lets you create tapered surfaces in cases where the taper condition is not satisfied (such as when the taper reference curve is in the same direction as the draw direction). It is particularly suited to aesthetic tapering.
Surface-based tapering also lets you create tapered surfaces in cases where the taper condition is not satisfied, using a different method of calculation. It is particularly suited to aesthetic tapering.
In many cases, surface-based and curve-based tapering yield identical solutions, as shown in Figure 20-9. Note that body b0 in this figure could not be tapered using the isocline-based method.
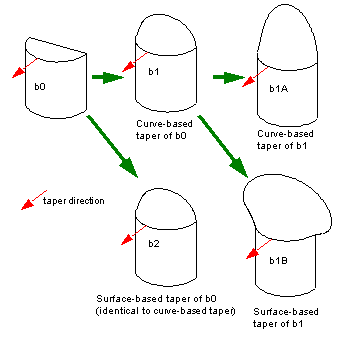
Figure 20-9 Creating surface and curve-based tapers
Offset tapering lets you create tapered surfaces in which the curve of the reference edge is projected onto a single top surface, creating a new "offset curve" that appears offset from the curve of the reference edge when viewed from the direction of taper, as shown in Section Figure 20-10.
When producing this type of taper, only one top surface is allowed, and it must be the surface of a face in the body. It should not be the surface of any taper face.
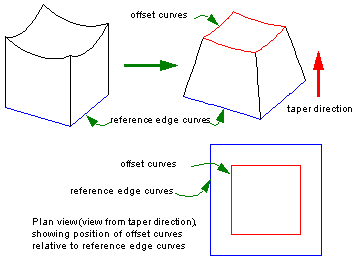
Figure 20-10 Creating an offset taper
| <<< Local Ops: Hollowing & Offsetting | Chapters | Local Ops: Double-Sided Tapering >>> |