 |
Sheet Modeling |
Sheet Modeling
| <<< Interpreting Face-Face Blending Error Codes | Chapters | Sheet Sewing >>> |
The Boolean operation of sewing sheet bodies together is explained in Chapter 36, "Sheet Sewing".
Information on modeling operations which can be applied to wire bodies is contained in Chapter 37, "Wire Modeling".
Typically, in a solids-based application, trimming operations would be performed using booleans. However, there are circumstances where it can be more efficient to trim a sheet body using a given entity.
The trimming of multi-face sheet bodies contains two stages:
In each of the following methods, edges created by the imprint operation are returned, including those existing edges along which the intersection occurred.
To solve any precision problems a tolerance is supplied, this value may also be used in the creation of SP-curves on the imprinted edges.
The imprinted curves can be projected onto the sheet body in two ways:
Edges and vertices are added to the sheet body which are the image of the curves under either projection method.
PK_BODY_imprint_faces - edges and vertices are added to the sheet body where the faces intersect with the body (except where they already exist).
PK_BODY_imprint_plane - edges and vertices are added to the sheet body where the plane intersects with the body (except where they already exist).
The trimming stage of the operation is performed using PK_BODY_trim which, to be successful, must divide the body into at least two sets of faces. This function takes as its arguments:
Should the trim operation fail, PK_BODY_trim_gap_analysis can be used to determine where the gaps of size less than the supplied tolerance exist, and the vertices bordering on these gaps are returned to enable corrective actions to be taken.
In this first example, a sheet body - created from a B-surface - is trimmed to an area resulting from the projection of two B-curves in a specified direction:

Figure 35-1 Trimming a sheet body to curves projected in a given direction
In this following example, a sheet body - created from a part of a cylinder - is trimmed to an area resulting from the projection of the circle down the face normal of the sheet body. This resulting face on the sheet body is selected not to survive the trim operation, effectively doing a pierce operation on the sheet body:
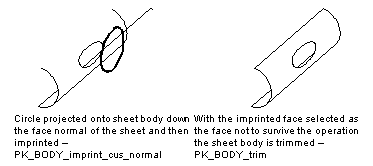
Figure 35-2 Trimming a sheet body using a circle projected down the face normal of the sheet body
By using the solid modeling blend functions for applying, fixing, enquiring and checking blends it is possible to blend edges of sheet bodies which meet at the boundary of the sheet body. Parasolid constructs appropriate edge geometry at the ends of the blend. The blend type can be rolling ball, variable radius or chamfer.

Parasolid's face-face blending functionality can be used to blend between disjoint and overlapping faces. In the following example face-face blends are applied sequentially to a set of sheet bodies, that have faces with taper angles, to form a single sheet body as follows:

Figure 35-4 Joining pairs of sheets

Figure 35-5 Using a third face-face blend to create the single sheet body
For further information on Face-Face blending, see Chapter 32, "Face-Face Blending".
To blend vertices on sheet bodies use PK_VERTEX_make_blend.
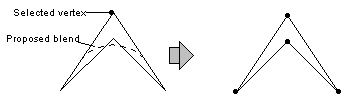
Figure 35-6 The proposed blend would create an invalid body, so the blend is not created

Figure 35-7 By selecting both vertices the final body is valid and the blends can be created
It is permissible for two blends to be sufficiently large that they meet and exclude one of the original edges providing that the blends do not overlap. For example, it is possible to make a circle by blending the four vertices of a square.
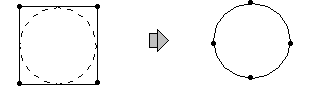
Figure 35-8 Blending four vertices of a square to create a circle

Figure 35-9 Blending a vertex with a radius that is equal to the distance to the next vertex
If the local checking option is ON the body is checked after the blending has been carried out. In the case of a planar body the altered body is valid, but for a non-planar body local checking may return that the altered body is invalid.
A sheet body can be thickened to form a solid body using PK_BODY_thicken_3. You can use this to model thin-walled parts, especially sheet metal parts, in your application.
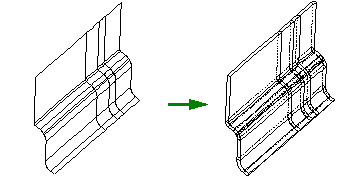
Figure 35-10 Thickening a sheet body into a solid body
Sheets may be thickened from either side, along the surface normal. All faces in the sheet body can be thickened by the same amount, or different distances can be specified for different faces. Only manifold sheets can be thickened.
The side faces created during thickening use analytic geometry where possible, or ruled B-surfaces otherwise. Some edge geometry on the sheet boundary may have to be approximated by SP-curves in order to generate boundary curves on the offset faces.
By default, side faces are created in the direction of the surface normals. If a punch direction is specified, then side faces are created in that direction instead, as shown in Figure 35-11.
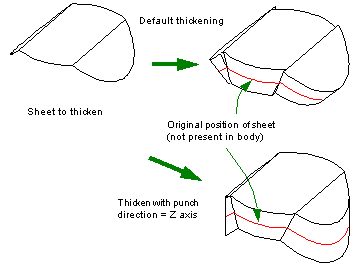
Figure 35-11 Specifying a punch direction for side faces
PK_BODY_thicken_3 uses Parasolid's existing offsetting functionality to thicken sheets. This means that certain topology changes are possible when thickening, such as deleting faces that become degenerate by offsetting. Figure 35-12 shows an example.
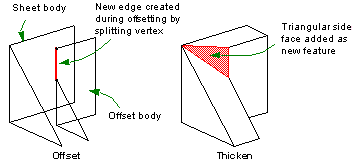
Figure 35-12 Thickening a sheet body, resulting in a topology change
In general, Parasolid creates triangular side faces when thickening sheets with sharp internal (i.e. non-boundary) edges. Sharp here means that the two faces adjacent to the edge do not meet smoothly.
Thickening fails on valid sheet bodies that have a point contact vertex as shown in Figure 35-13. Thickening this sheet body creates an invalid solid body that contains a non-manifold edge.

Figure 35-13 Thickening a sheet body with a point contact vertex
PK_BODY_thicken_3 receives and returns the following arguments:
| Received | Description |
|---|---|
| Returned | Description |
A number of thickening options can be specified using PK_BODY_thicken_o_t. Default values are set such that all faces in the sheet body are thickened by the amount specified in the arguments to PK_BODY_thicken_3.
| Option | Description |
|---|---|
|
The number of faces to be offset by a non-default distance. The |
|
|
An array of faces to be offset by a distance other than |
|
|
An array of front offsets to use for the specified |
|
|
An array of back offsets to use for the specified |
|
|
Whether or not to check for face-face inconsistencies. Default: PK_check_fa_fa_yes_c. |
|
|
The thickening method to use. This can be either:
|
|
|
A vector representing the direction of the side faces, when |
|
|
The offset method to use when thickening. This is either: See Section 35.4.4. |
Sometimes, thickening a sheet may create self-intersecting surfaces on either the side face, or the offset face itself. These can be repaired, as follows:
offset_method
is set to PK_offset_method_approximate_c. See Figure 35-15.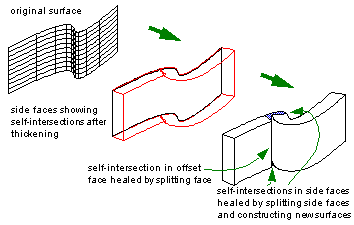
Figure 35-14 Replacing self-intersecting side surfaces during thickening

Figure 35-15 Replacing self-intersecting offset surfaces during thickening
See Section 19.3.1, "Removing self-intersections" for more information.
Providing that the relevant face of a sheet body has a surface attached to it, then the following operations can be carried out on it:
Holes can be removed from single and multi-faced sheet bodies (providing that the hole lies completely within a single face) by specifying a list of interior loops to be deleted by using PK_LOOP_delete_from_sheet_body.
The surface of a sheet can be tweaked to a new surface, which must be of the same type as the original surface, using PK_BODY_embed_in_surf. During this operation the parameter space representation of the edges is maintained.
If the edge curve is of type PK_CLASS_spcurve or a constant parameter curve of the surface of the face then it is transferred to the new surface. All other types of edge curves are converted to SP-curves before being transferred to the new surface. During this conversion, edges may need to be split at surface discontinuities.
| <<< Interpreting Face-Face Blending Error Codes | Chapters | Sheet Sewing >>> |