Blend Geometry
ACIS allows round blends, chamfer blends, and vertex nsided patches (Gregory Polygon surfaces).
Blend Radius
The blend radius refers to the radius of the figurative rolling ball. The blend radius may either be constant or variable. Any combination of variable radius and constant radius blends may exist in a sequence of edges to be blended, as long as they always meet one another with matching radius values.
Constant Radius Blends
When the blend radius is constant, the spine and spring curves are obtained by:
- Offsetting the two body surfaces by the radius distance.
- Intersecting the two offset surfaces to find the blended spine.
- Projecting the spine onto each of the two body surfaces to find the spring curves.
Constant radius blends are represented by the rolling ball surface type (rb_blend_spl_sur). Older versions of ACIS used a pipe surface (pipe_spl_sur), and this behavior can be recovered by setting the option rb_replace_pipe to off (false). However, applications are strongly discouraged from changing this option.
The surface of a constant radius blend is represented by either a spline surface or a simple analytic surface. The spring curves bound the portion of the surface used for the blend.
In general, the blend surface is represented by a spline. Under certain geometric conditions, (i.e., when the spine curve is a simple curve type), the blend surface is represented by a simple analytic surface. For example:
| If the spine is a: | The surface is a: |
| straight line | cylinder |
| circular arc | torus |
| point | sphere |
The corresponding points on the spine and spring curves (i.e., the center and the two contact points of the rolling ball at a given position) determine a plane. The spine curve is perpendicular to this plane. Dropping a perpendicular from a point on the spine curve onto the other two curves provides the corresponding points.
Variable Radius Blends
Allowing the blend radius to vary introduces some fundamental differences into the algorithms. The offset intersection algorithm used to find the spine and spring curves works only for constant radius blends, because a variable offset is ill-defined on a surface. A figurative rolling ball must be set up at the desired position to evaluate the curves and the blend surface, and a marching algorithm is required to find the approximating curves and surface. Analytic surfaces cannot be used to represent even simple variable radius blends. The spine and spring curves are no longer perpendicular to the plane defined by corresponding points.
When a variable radius function is specified, there must be some way to indicate exactly where along the blend a particular radius value is obtained. ACIS uses the geometry of the edge being blended to calibrate this. The parameter of the radius function is the parameter of the edge curve. At a given vparameter, a ball of radius r(v) is set up so that its center is in the plane perpendicular to the edge curve, evaluated at v.
Variable Radius Blend Surface Types
Standard blending supports two mathematical definitions of variable radius blend surfaces. The first is a rolling ball snapshot blend surface. The second type (introduced in Release 5.0) is a rolling ball envelope blend surface. Although geometrically similar, sequences of the rolling ball envelope surface are smoother, and their offsets are better behaved. Their spring curves are identical, but the cross sections have a subtly different shape. This allows the rolling ball envelope to be perfectly smooth across transitions between blend surfaces in a smooth sequence of edges.
The Advanced Blending Component provides a third mathematical definition of a variable radius blend surface called a sliding disc. Both the rolling ball snapshot and the sliding disc surface types have a slight crease between faces if the blend rolls across an edge that is smooth but not curvature continuous and if the radius is varying as it crosses the edge. This can cause near tangency problems when the surfaces are offset. The rolling ball envelope surface addresses this problem and permits robust performance in operations that use surface offsets.
The type of variable radius blend surface created (for standard blending only) is controlled by option bl_envelope_surf. If this option is on (true), a rolling ball envelope blend surface is created. If it is off (false), a rolling ball snapshot blend surface is created. However, applications are discouraged from changing this option setting.
Simplest Variable Radius Blend Surface Used
The variable radius blend algorithms construct the simplest blend surface that can represent the geometry requested. For example, if a variable radius blend is specified with a start and an end radius value, and these values are the same, then a constant blend will be made. This behavior is controlled by the option blend_make_simple, but applications are strongly discouraged from changing this option setting.
Geometric Limitation on the Blend Radius
During blending, if the blend supports are not flat (the curvature of a blend support is of the same type as the curvature of the blend being requested), then the blend surface may become self-intersecting, resulting in the blend operation to fail.
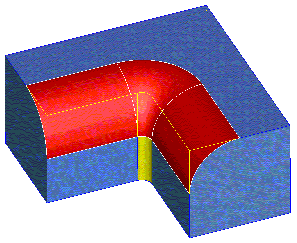
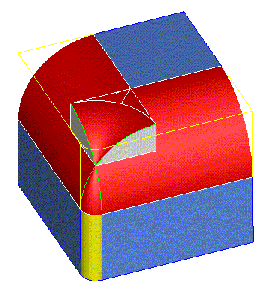
Consider two bodies (refer to the figures below), which are quite similar with the exception of the cylindrical face (highlighted in yellow shade) being concave in the first figure and convex in the second figure:
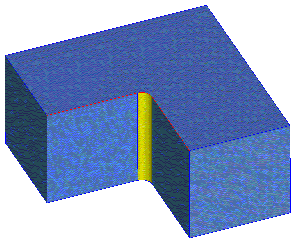
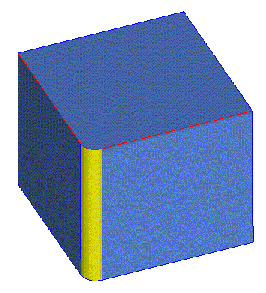
When attempting to blend the three edges marked red (in the figures shown below), it should be noted that both bodies have high-curvature face (highlighted in yellow shade), which should serve as a support for one of the blend faces. In both the bodies, the curvature radius of the yellow face is lower then the requested blend radius. This does not present any difficulties in the first case, as the curvature vector of the support surface and that of the blend face point in opposite direction (that is, the support is concave but the blend in convex). However in the second case, both the curvatures point inside the body (that is, both the support and the requested blend surface are convex), which causes the upper spring curve to form a loop and the blend surface to self-intersect. Such an invalid situation gets detected by ACIS and results in an error message to report a blend failure.
Cross Section
A blend between two entities has a characteristic shape which is defined by the cross section of the blend surface. The cross section is the shortest line along the blend surface that connects the two faces being blended. The cross section is always perpendicular to both faces in the blend.
A circular (round) blend has a circular cross section. The cross section of a chamfer blend is a straight line.
Round Blends
A round blend refers to the surface produced by either of the following:
- Rolling a ball of constant or variable radius along an edge while keeping the ball in contact with the faces to either side of the edge.
- Rolling a ball of constant radius around a vertex while keeping the ball in contact with a face and an edge adjacent to the vertex.
In general, the envelope of the rolling balls path is represented by a spline surface. When possible, it is represented by a simple analytic surface. In either case, the surface is tangent to the two faces and has precise evaluators.
Spring curves follow the point of contact between the pipe and the two faces. The portion of a pipe surface that lies between the spring curves is used to form the round blend face.
Note: The phrase between the spring curves refers to the portion of the surface with smaller arc length.
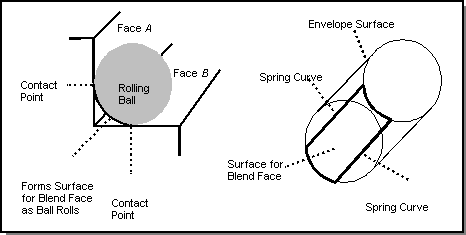
Figure. Blend Face Between Spring Curves
Chamfer Blends
Chamfering is a ruled surface swept out between the contact points on the support surfaces. The following figure shows an example of a chamfer blend.
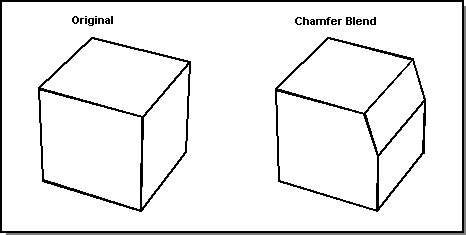
Figure. Chamfer Blend
Standard Chamfering is contained in the blend component and provides functionality for generating chamfers between analytic support surfaces configured in such a way that the chamfer surface can be represented by a plane or a cone. The size and orientation of the chamfer are defined by specifying an "in-support" distance ("range") for each support. This range is defined to be the distance in the support between the edge being chamfered and the contact point on the support where the chamfer intersects the support as shown below.
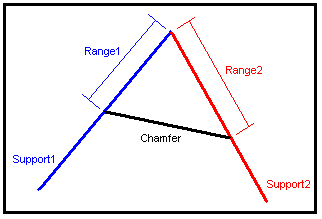
Figure. Standard Chamfering
Vertex Blends
ACIS supports vertex blends and provides a variety of ways to control the shape of the vertex blend surface. Parameters to control the shape (for example, setbacks, etc.) may be passed explicitly, or ACIS may be left to work them out automatically (by specifying autosetback or no parameters at all).
Setbacks
When a blended edge ends in a blended vertex, the blend face made for the edge meets the blend face made for the vertex in a cross edge. ACIS needs to find a position and inclination for this cross edge. In such cases, start and end setbacks may be applied to each end of the blended edge. A setback specifies the distance along an edge back from the vertex at which the blend stops.
The setback defines a plane which is normal to the edge through a point on the edge and set back from the edge end by the given distance. The intersection of the setback plane with the blend surface defines a curve that may be used to bound part of the face for the blended vertex at the end of the edge.
The setback can be defined in one of the following ways:
- The setback can be specified at the time the implicit blend is put on each edge (it must be for the start or end of the edge, as appropriate).
- For a constant round, the cross curve will then be a circular arc. The distance of the setback is approximately the distance of the cross curve from the vertex at the end of the edge. The cross edge will not be inclined (i.e., it will not be oblique).
- Blend all the edges at the vertex, specifying blend size and shape, but no setbacks. Then, blend the vertex, at which time the setback is applied.
If the setback is to be applied on the vertex blend, it may be:
- Specified explicitly
- Calculated automatically (autosetback)
- Not specified at all
Setback Specified Explicitly
Start and end setbacks may be specified explicitly when the blend is set by passing the values as arguments to various blend APIs (or test harness commands or Scheme extensions). Valid values for setback depend on the size and geometry of the edges at the vertex being blended.
If the user specifies a setback that is smaller than the smallest setback practical, that value will be overridden and the smallest practical value used instead (refer to section No Setback Specified for information about how this minimum value is determined).
Oblique Setbacks
If the setback is specified explicitly, it may be inclined (oblique). This is a further refinement that lets the setback on the left spring curve of a blended edge differ from the setback on the right spring curve. This gives further control over the boundary shape of the blend face made for a vertex blend.
Oblique setbacks can be selected in one of two ways:
- In addition to the setback, the user can provide a signed value, which is the difference between the setbacks (left setback - right setback). This can be specified for the start and end of the blend.
- Oblique setbacks can also be selected without explicitly specifying the setback difference. Flag arguments in the APIs indicate whether or not the difference is specified.
If the difference is not specified, when the left and right spring curves of the blended edge are intersected with the spring curves of the adjacent blended edges at the blended vertex, and when two intersection points are obtained (one for each spring curve), the cross edge is inclined so that it passes through both the intersection points. This gives the smallest and topologically simplest vertex blend face.
For a blended vertex of uniform convexity (its n edges are all convex or are all concave), the vertex blend face made will have n sides. If the blended vertex is not of uniform convexity, the blend face will have more than n sides; i.e., in addition to n cross edges, its will have one or more spring edges (edges at which the vertex blend surface springs from surfaces of faces adjacent to the blend vertex).
When a vertex is of mixed convexity or the sizes of the blends on its edges differ greatly, the oblique option can lead to poor shapes for the vertex blend boundary (angles at vertices of the boundary must be less than pi). In that case it is probably best to compute setbacks automatically.
Automatic Setback Calculation (Autosetback)
The setback can be automatically calculated, which means ACIS finds and assigns setbacks at a blended vertex (provided the edges at the vertex already carry implicit blend attributes). Autosetback is applied to a vertex blend using the api_set_vblend_auto function.
Users may want to use autosetback to get a good starting point, and then adjust the setbacks manually for further refinement of the blend shape.
Autosetback finds an average blend size for the edges at the vertex. For each edge, it considers the edge adjacent on the clockwise side and finds a setback that allows a spring curve of radius close to the average blend size, and similarly for the counterclockwise side. It then chooses the greater of the two setbacks for the current edge. This method regards the vertex as polyhedral; i.e., it looks at normals and tangents at the vertex.
Autosetback never makes oblique setbacks. However, it is possible to introduce oblique setbacks by manually refining the setback to improve vertex blend shape after the automatic setback calculation.
Because autosetback uses the sizes of the blends and the angles in which the edges meet at the vertex to estimate the setbacks, it works reasonably well if all of the following conditions are true:
- Blends on the edges are not too different in size (and not of zero size)
- Edges meet in angles not too different at the vertex (and not zero or pi)
- Edges are not too highly curved (calculations are made as if the edges were straight)
Note: A variant of autosetback exists for historical reasons. It is called autoblend ( api_set_vblend_autoblend) and differs from autosetback in that it will use simple surfaces (spheres, etc.) whenever possible (autosetback does not), otherwise, it uses the same setbacks as autosetback.
No Setback Specified
If no setback is specified, ACIS must still find the position of the cross edge. Given a blended edge with no setback specified, ACIS intersects the spring curves of the blend geometry found for the edge with the spring curves made for the adjacent blended edges at the vertex (i.e., the edges that are found by stepping to the next edge clockwise or counter-clockwise about the vertex).
Usually, two intersection points are found: one for the left and one for right spring curve. ACIS chooses the intersection point further from the blended vertex and positions the cross edge to pass through that point. If an adjacent edge meets the current edge in a reflex angle (greater than pi), no point will be found for that side, but a point must exist for the other side and that will be used to position the cross edge. In effect, this method finds the smallest setback practical for a nonoblique cross edge.
Some final adjustments are made in order to remove or improve any awkwardly shaped curves, sometimes resulting in oblique cross curves.
As a rule of thumb, use no setbacks at all to obtain the smallest pleasing vertex blend surface, and use autosetback to obtain a larger extent for the blend surface. If no setbacks are specified, simple vertex blend surfaces will be made whenever possible (for example, spheres, tori, etc.). Using autosetback precludes the creation of such simple surfaces, and an nsided patch will always result.
Vertex Setback Example
The following figure illustrates a vertex blend with no setback, then the same blend with two different setbacks. The original block is 100 x 100 x 100. In the blend with no setback, oblique cross curves are used automatically to create a minimal blend. The first setback is 20, and the second setback is 40. With a setback of 40, the blend is larger. In this example, a setback of 200 is invalid, because it is larger than the length of the edges.
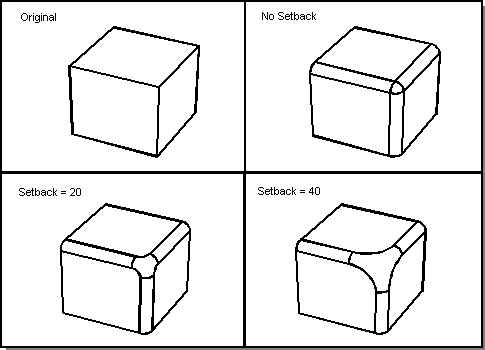
Figure. Vertex Setback
Bulge Factor
The bulge factor is a number used to control the shape of the vertex blend. The bulge factor affects the interior shape of the vertex blend surface. It has no effect on the boundaries of the blend surface. It also affects only the nsided patch surface, making no difference when spheres or tori (etc.) are used.
The bulge factor value ranges from 0.0 to 2.0. If the bulge factor is not set by the user, it is set to the default value, 1.0. A larger value increases the fullness of the blend. A value of zero is usually suitable for a blend at a mixed convexity vertex, but for a uniform convexity vertex (i.e., all of whose edges are either convex or concave), a positive bulge factor may improve the shape obtained. The following figure illustrates a vertex blend with no bulge (blend is flatter) and then the same blend with bulge = 2.0, which produces a fuller blend. The default value of 1.0 should normally be acceptable.
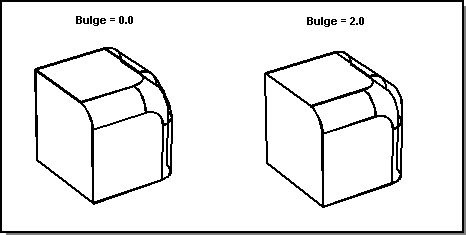
Figure. Bulge
Vertex N-Sided Gregory Polygon Surface
A vertexnsided Gregory polygon surface is the case in which all of the edges meeting at an internal vertex are to be blended. They do not have to have identical blend radii, nor do they have any smoothness requirements.
An nsided Gregory polygon surface is typically produced when a sphere, torus, or rolling ball blend will not fit into the vertex region (for example, if all the blends that meet there are of different radii), or when setbacks are given (as in the following figure).

Figure. NSided Gregory Polygon Surface
Other cases of internal vertices that are not explicitly blended with an nsided Gregory polygon surface are handled by other techniques. The vertex may be smoothed away by blending one of the edges at the vertex, leaving a smooth sequence of edges that are then blended in a second step. Another option is to simultaneously blend a pair of edges at the vertex to form a mitered joint.
Approximated Vertex Blend Surface
The API function api_make_VBL_output_surfaces approximates an n-sided VBL_SURF surface by n four-sided bs3_surfaces. This enables ACIS to output vertex blend surfaces in a form that can be read and used by most other systems.
[Top]
© 1989-2007 Spatial Corp., a Dassault Systèmes company. All rights reserved.