 |
Face-Face Blending |
Face-Face Blending
| <<< Interpreting Edge Blending Error Codes | Chapters | Interpreting Face-Face Blending Error Codes >>> |
Figure 33-1 shows an example where two disjoint sheet bodies have been joined together by creating a face-face blend between them.

Figure 33-1 Blending two sets of faces
Face-face blending differs from edge blending as follows:
This chapter provides a complete description of Parasolid's support for face-face blending. Section 33.2, "Face-face blending concepts", explains the main concepts involved in face-face blending, and also provides a starting-point for the material in the rest of this chapter.
In a face-face blend, the two sets of faces to blend are known as the left and right walls of the blend. You define a face-face blend between two walls using a combination of the following three independent properties.
| Property | Description |
|---|---|
|
The cross-section planes of the blend. 
|
|
|
The two contact points in each cross-section plane at which the blend touches the faces being blended. |
Contact points can either be defined implicitly - you specify the size of the blend and let Parasolid calculate the exact contact points, or explicitly - you define a curve that must form one of the boundaries of the blend surface. Blends may be either symmetric (defined using a single parameter), or asymmetric (defined using two parameters). See Section 33.4, "Defining contact points". |
|
The cross-section shape of the curve between the two contact points in the cross-section plane . |
You can define a range of cross-section shapes in the cross-section plane. These fall into three types: |
These properties are illustrated in Figure 33-2.

Figure 33-2 General definition of a face-face blend
In addition to these basic properties of a face-face blend, there are a number of usability factors that determine the final appearance of a blend.
This section explains some general properties of face-face blends that have not already been mentioned.
When you create face-face blends between face sets from a single solid body, the blend faces can usually only be attached one way round. However, when blending between walls of sheet faces, the orientation of the blend face depends on the direction of the sheet face normals. Depending on those normals (and how you trim the blend - see Section 33.2), you can create very different effects from the same set of walls.
You define the orientation of a face-face blend by specifying a logical sense for both the left and right walls. By convention, if the sense for a given wall is true, then the blend is produced to lie behind the wall, with respect to the normals of the faces in the wall. This is illustrated in Figure 33-3, which shows how four different blends can be created between the same two sets of sheet faces.

Figure 33-3 Specifying different blend faces from the same walls using different senses
|
Note: When you create face-face blends in a solid body, always make the left and right senses equal. |
Even when blending sheet bodies, there are not usually four possible options for the blend orientation.
The first face in the list of faces that defines a given wall is called the master face. A face-face blend must pass through at least one of the two master faces for the blend to succeed.
If a wall consists of a single face, or a set of faces in a single row, this is usually not a problem. However, if a wall has a set of faces in several rows, then the blend may fail, depending on the how big the blend surface is and which faces are the master faces. Figure 33-4 shows the difference between blends that can succeed, and blends which fail because of the position of the master faces.

Figure 33-4 The use of master faces in face-face blends
Face-face blends are created using PK_FACE_make_blend, which takes and returns the following arguments:
As described in Section 33.2, the cross-section planes of a face-face blend are the set of notional planes that pass through the blend surface, and contain the contact points and curve shape for the blend. You can create different blend effects by specifying the way the cross-section planes are orientated.
Cross-section planes can be orthogonal to either:
The first two of these options are by far the most common. Figure 33-5 shows the difference between them. Figure 33-6 shows an example of the third option.

Figure 33-5 Orientation of cross-section planes in rolling ball blends and disc blends

Figure 33-6 Blending faces using an isoparameter cross-section plane
More information about each type of cross-section plane is shown below:
When specifying a blend, you may need to supply a parameter spine. This is a 3-space curve, which in general terms should follow the path of the blend. Choosing a suitable parameter spine depends on the type of cross-section plane you are using.
| Blend cross-section | Parameter spine details |
|---|---|
|
Rolling ball blends do not usually need a parameter spine. In cases where one is necessary, it should not be too accurate: a straight line between points near the start and the end of the intended blend is often sufficient. If you attempt to approximate to the path of the blend too accurately, the parameter spine may contain regions of tight curvature and the blend may fail. |
|
|
Disc blends do need a parameter spine, since the cross-section planes in the blend are orthogonal to the parameter spine. The absolute position of the parameter spine in 3-space need not be accurate, but its direction should be, since this influences the final shape of the blend, as shown in Figure 33-7. |
|
|
For isoparameter blends, the parameter-spine must lie in the left-hand wall. |
For all types of cross-section plane, the general shape of the parameter spine is important. For example, if a blend is going to be a periodic, the parameter spine must be periodic.

Figure 33-7 Changing a disc blend using different parameter spines
The options used to define cross-section planes are in the
shape
sub-structure (PK_blend_shape_t) of PK_FACE_make_blends_o_t. They are as follows:
| Option | Description |
|---|---|
xsection |
|
parameter |
A 3D parameter curve that defines the parameter spine to use for the blend. Default: PK_ENTITY_null. |
Each cross-section plane in a blend contains two contact points, where the blend surface touches one of the blend walls. You can define where the contact point lies either
This section explains both these strategies in turn.
One way of defining where the contact points lie in a cross-section plane is by specifying how large the blend should be. Based on this information, Parasolid calculates exactly where the boundary of the blend lies, and, hence, the position of the contact points on each cross-section plane.
The size of a blend is specified with reference to the blend spine. For example, in the case of a symmetric rolling ball blend, the blend spine is the path taken by the center of the rolling ball as it moves from one end of the blend walls to the other, as shown in Figure 33-8. In the case of a symmetric disc blend, it is the path taken by the center of the swept circle.
Do not confuse the blend spine, which describes the exact path taken by a blend, with the parameter spine, which is just a guide to the direction of the blend.

Figure 33-8 Comparison of blend spine and parameter spine in a rolling ball blend
There are three ways to specify the size of a blend, in terms of the distance between the blend spine and the blend walls:
You define a constant radius blend by specifying a single value that represents the distance of the blend spine from both blend walls. Constant radius blends always produce symmetric blends. Figure 33-9 shows the differences between constant radius and variable radius blends.
Constant radius blends can be combined with any kind of cross-section plane.
A constant radius blend is defined using a single parameter. By contrast, you can define a variable radius blend by specifying two parameters:
These parameters are themselves not single values, but ranges of values that describe how the distance between the blend spine and the given wall varies along the extent of the blend.
Variable radius blends can be asymmetric (if the ranges are different), or symmetric (if the ranges are the same, or if only a range for the left wall is supplied).
Variable radius blends can be combined with any kind of cross-section plane.

Figure 33-9 Constant radius and variable radius blends
|
Note: You can approximate a constant radius blend with a variable radius blend by setting the same, unvarying, range for both walls. |
You can create blends that have a constant chordal width, as shown in Figure 33-10.

Figure 33-10 Constant radius vs. constant width blends
This type of blend is particularly useful when the angle between the faces to be blended varies along the extent of the blend, but you want to keep the amount of blend material constant along the whole blend. Figure 33-11 illustrates how the shape of the blend changes with the angle for such faces.

Figure 33-11 Blend shape at (a) the start and (b) the end of a constant width blend
In addition to specifying a width, you can specify a ratio of the ranges to use when creating the blend. This creates a constant width blend with an asymmetrical cross-section. The ratio is interpreted with reference to the left and right walls of the blend, as shown in Figure 33-12.

Figure 33-12 Creating asssymetric constant width blends using the
ratio
field
You can only produce constant width blends with a rolling ball cross-section plane. Constant width blends cannot be used in conjunction with cliffedges or holdlines: see Section 33.4.2 and Section 33.4.3, for details about these constraints.
The options used to define the size of a face-face blend are in the
shape
sub-structure (PK_blend_shape_t) of PK_FACE_make_blends_o_t. They are as follows:
|
Note: You can only specify these options in the following combinations: |
As well as defining contact points by specifying the size of the blend, you can specify contact points explicitly, by defining one or both boundaries of the blend.
The boundary of a blend, when specified explicitly, is often referred to as a holdline, because it holds the blend inside the specified line. All holdlines are represented by an array of one or more edges.
You can specify the boundary of a blend using :
You can use tangent holdlines to create symmetric variable radius blends. However, rather than defining how the ranges vary along the extent of the blend, you specify a tangent holdline to use as one of the blend boundaries. Parasolid calculates the blend's range for the wall that the tangent holdline lies on, based on the tangent holdline and the supplied cross-section plane. Parasolid then uses this range to calculate the opposing blend boundary on the other wall, as shown in Figure 33-13.

Figure 33-13 Supplying tangent holdlines to create symmetric variable radius blends
You can supply more than one edge as a tangent holdline.
Like tangent holdlines, you can use conic holdlines to create variable radius blends. However, a conic holdline only specifies the range of the blend for one wall. The range of the blend for the other wall is specified either:
Whereas tangent holdlines can only be used to create symmetric variable radius blends, conic holdlines can create asymmetric variable radius blends.

Figure 33-14 Supplying conic holdlines to create asymmetric variable radius blends
A double conic holdline blend is a blend in which the blend boundaries in both walls are specified using a conic holdline. To define a double conic holdline, you must specify at least two edges to use as blend boundaries.

Figure 33-15 Double conic holdline blend
Section 33.4.2, "Specifying the boundary of the blend", described how you can use tangent and conic holdlines to define the entire boundary of a blend. You can also use these holdlines to constrain the boundary locally, along just a part of a blend. To do this you specify both:
Wherever the holdline falls inside the boundary of the defined blend (that is, wherever the holdline creates a smaller blend than the specified blend size), Parasolid ensures the blend follows the holdline, rather than the original blend boundary. This is illustrated in Figure 33-16, which shows a constant radius blend that is constrained locally using a curve. In Figure 33-16 (a), this curve is used as a tangent holdline, creating the symmetric variable radius blend shown. By contrast, in Figure 33-16 (b), the same curve is used as a conic holdline, creating an asymmetric variable radius blend.

Figure 33-16 Constraining a blend locally using (a) tangent and (b) conic holdlines
A third way of constraining the boundary of a blend locally is to define a cliffedge blend. Cliffedge blends differ from holdlines in one important respect: the blend surface does not have to join the blend wall tangentially along the cliffedge. (Blends with a chamfer cross-section shape are an exception to this, since they never join the blend wall tangentially. Any holdline or cliffedge blend may have a chamfer cross-section. See Section 33.5.2, "Chamfer cross-sections".)
Cliffedge blends do not affect the symmetry of a blend.

Figure 33-17 Constraining a blend locally using cliffedges
|
Note: Cliffedge blends can only be used to constrain a blend locally within a specified area. If you want to use a cliffedge along the entire boundary of a blend, you need to specify another size control for the side that has the cliffedge. This can be either a radius, ranges, or a tangent holdline on the opposite side. This additional size control needs to be large enough that the cliffedge constraint is used along the entire extent of the blend. See Figure 33-32 for an example. |
By default, the holdlines and cliffedge blends described in Section 33.4.2 and Section 33.4.3 are defined with reference to the part of the wall that lies below the specified holdline or cliffedge. Sometimes, it can be useful to specify a blend that is defined with reference to the part of the wall that lies above the holdline or cliffedge. Such a blend is known as an inverted holdline or cliffedge.
Inverting a holdline blend makes the blend tangent to the face above the holdline rather than the face below, as shown in Figure 33-18.

Figure 33-18 Using inverted holdline blends to control the tangency of a blend
Using an inverted holdline lets you create a blend when there is no face below the cliffedge or holdline (for example, on sheet edges), or replace a single face with a blend (for example on the top of a rib), such as the examples shown in Figure 33-19.

Figure 33-19 Using inverted blends to (a) create a blend on a sheet edge (b) replace a face with a blend
Like holdlines, you can use inverted holdlines to constrain the shape of a blend locally. However, whereas a holdline constrains the blend to follow the boundary that produces the smallest blend radius, an inverted holdline constrains the blend to follow the boundary that produces the largest blend radius.
The difference between these two methods is illustrated in Figure 33-20. In general, using an inverted holdline increases the amount of blend surface that is created. In particular, it can be used to maintain the minimum height of the blend along a wall, which improves the overall appearance of the finished blend, and generally creates a more rigid structure. Figure 33-21 shows a good example of this technique in practice, where an inverted holdline has been used to let the blend surface flow smoothly over the drop.

Figure 33-20 Constraining the blend radius using inverted holdlines

Figure 33-21 Using inverted holdlines to improve blend support
The options used to define the boundary of a face-face blend are in the
constraints
sub-structure (PK_blend_constraint_t) of PK_FACE_make_blends_o_t. They are as follows:
| Option | Description |
|---|---|
tangent_edges |
|
conic_edges |
|
cliff_edges |
|
inv_tangent_edges |
|
inv_conic_edges |
In addition, the following option is in PK_FACE_make_blends_o_t:
| Option | Description |
|---|---|
update |
Whether or not to invert cliffedges and holdlines automatically. It has two values:
Tangent and conic holdlines are not inverted automatically if they are used to constrain a blend locally (as described in Section 33.4.3), regardless of this setting. |
Section 33.3, "Defining the cross-section plane", explained how you specify the cross-section planes in a face-face blend. Section 33.4, "Defining contact points", explained the different ways that the contact points on those planes can be defined. This section explains how you can specify the shape of the curve that joins the contact points together on the cross-section plane.
There are three general types of cross-section shape that you can specify:
In addition, you can optionally control the precise shape of any conic or curvature continuous cross-section. See Section 33.5.4 for details.
If necessary, you can let Parasolid infer the cross-section shape from other information that you have provided. See Section 33.5.5.
You can create a conic blend between contact points that have been created using any of the methods discussed in Section 33.4, "Defining contact points".
Without extra information, Parasolid always creates a cross-section that is either circular or a least-tension ellipse. In most cases, this is sufficient. However, if you would like to create a different cross-section, such as a hyperbola or a parabola, you need to pass a
rho
value. See Section 33.5.4 for details.
If you specify a conic cross-section, Parasolid infers the precise nature of the conic based on other information that you specify.
A chamfer cross-section is perhaps the simplest type of cross-section shape, since it consists of a straight line between the contact points. Chamfer blends are unusual in that the blend is not tangent to the blend walls.
Figure 33-22 shows an example of a variable radius chamfer blend, although you can create a chamfer blend between contact points that have been created using any of the methods discussed in Section 33.4, "Defining contact points".

Figure 33-22 Creating a variable radius chamfer blend between two walls
Curvature continuous blends have a cross-section that has the same curvature as each wall at the contact points.
If you wish, Parasolid can calculate an appropriate curvature continuous blend from the supplied contact point data. You can have more control over the precise shape of the blend by passing a depth curve to PK_FACE_make_blend as well. See Section 33.5.4 for more information.
You can control the shape of a conic cross-section by supplying a rho value in the call to PK_FACE_make_blend. This is a 1D law curve that defines the positions of the deepest points along the blend, as shown in Figure 33-23.

Figure 33-23 Using a rho value to control the curve shape
Each point on the curve is a real number between 0 and 1, that is interpreted as follows:
| Rho value | Description |
|---|---|
|
Cross-section is an ellipse. As rho approaches 0, the blend becomes flatter, and closer to a chamfer. The value 0 is not allowed. Use a chamfer blend if you require a true chamfer: see Section 33.5.2. |
|
|
Cross-section is a hyperbola. As rho approaches 1, the blend becomes more L-shaped. A value of 1 is not allowed. |

Figure 33-24 Elliptical and hyperbolic cross-section shapes in face-face blends
|
Note: If you supply a rho value, you must also supply a parameter spine. See Section 33.3.1 for details. |
You can control the shape of a curvature continuous cross-section by supplying a depth curve in the call to PK_FACE_make_blend. This is a 2D B-curve whose parameter space is that of the portion of the parameter spine in the region of the blend. It is used to determine the point of maximum depth of the blend.
Each point along the supplied depth curve contains two parameters that set the position of the deepest point in the blend (known as the depth point). The parameters represent the following information respectively:
These parameters are illustrated in Figure 33-25.
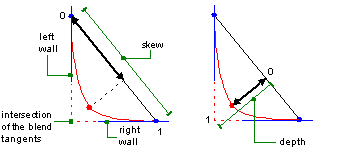
Figure 33-25 Defining the skew and depth in a curvature continuous blend
|
Note: If you supply a depth curve, you must also supply a parameter spine. See Section 33.3.1 for details. |
Generally, you should specify either conic, chamfer, or curvature-continuous cross-section shape explicitly when creating face-face blends. If necessary, however, you can omit this specification, and let Parasolid infer the cross-section shape based on the other information you have provided, such as a rho value, ranges, or depth curve.
If you do this, then a number of restrictions apply to face-face blending, as follows:
The options for controlling the cross section shape of a blend are all contained in the shape sub-structure (PK_blend_shape_t) of PK_FACE_make_blend_o_t. They are as follows:
| Option | Description |
|---|---|
xs_shape |
Specifies the cross-section shape of the blend. This can have one of the following values:
|
rho |
A 1D law curve that describes a general conic cross-section shape. See Section 33.5.4. You can use this to control the shape of a conic cross-section.
If you supply |
depth |
A 2D law curve that describes a curvature continuous cross-section shape. You can use this to control the shape of a curvature continuous cross-section. See Section 33.5.4.
If you supply |
Once a blend has been created, it needs to be trimmed appropriately to any surrounding geometry. Parasolid supports:
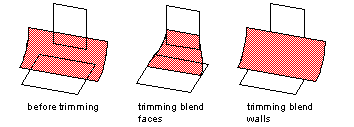
Figure 33-26 Trimming blend faces and blend walls
You need to specify how blend faces should be trimmed to the boundaries of the blend walls. This is done using the the
trim
option (PK_blend_trim_t) in PK_FACE_make_blends_o_t, which takes the following values:
| Value | Description |
|---|---|
|
Trim blend faces to walls (the default). The blend is terminated by curves chosen such that the side boundaries are the correct lengths for attaching to both walls. |
|
|
Do not trim blend faces. The blend faces are created so that they extend beyond the underlying walls. |
|
|
Long trim to walls. The ends of the blend are created using constant parameter lines determined by the wall boundaries such that the blend is as long as possible. |
|
|
Short trim to walls. The blend is created such that the blend end boundaries are the constant parameter lines determined by the wall boundaries such that the blend is as short as possible. Short trim blends can be attached internally to multiple face sheet bodies and to solid bodies. Blends are capped using planar capping surfaces as required, as shown in Figure 33-28. |
These are illustrated in Figure 33-27.
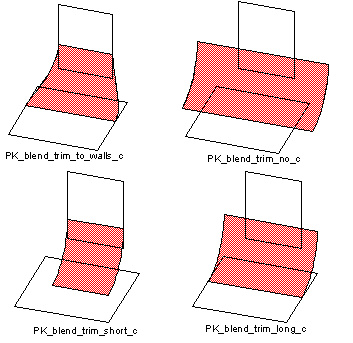
Figure 33-27 Trimming blend faces to walls
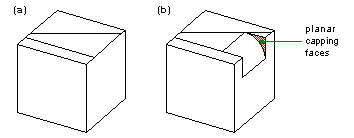
Figure 33-28 Before (a) and after (b) attaching short trim blends internally
You need to specify whether to trim the walls back to where they meet the blend face, as shown in Figure 33-29, and in what form you want the walls and blend returned. You do this using the the
walls
option (PK_blend_walls_t) in PK_FACE_make_blends_o_t, which takes the following values:
| Value | Description |
|---|---|
|
Does not trim either of the walls. The blend is not attached to the walls and is returned as a separate body. |
|
|
Trims both walls, but does not attach the blend to the walls. The blend is returned as a separate body. You can only use this token if you are blending between two sheet bodies. |
|
|
Trims both walls and attaches the blend to the walls. If the blend is between two different bodies then they are united into a single body, with the body containing the left wall treated as the target. |
|
|
Trims both walls, attaches the blend to the walls, and creates a solid body if possible. This is the same as PK_blend_walls_attach_c, except that if the result of the blending operation forms a closed volume, a solid body is created. This token can only be used in conjunction with PK_blend_trim_to_walls_c. |
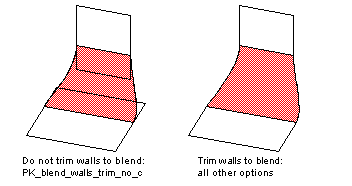
Figure 33-29 Trimming walls to blend faces
As well as supplying options to trim the blend faces and walls, you can supply a plane to trim the end of a blend. The blend face is trimmed along a constant parameter line that is calculated from the point at which the supplied plane intersects the blend spine, as shown in Figure 33-30. The blend is trimmed to lie on the positive side of the plane.

Figure 33-30 Blend trimmed to a limit plane
You can either supply one plane, in the field
limit_1
, or two, in
limit_1
and
limit_2
. If you supply one plane, it can be used to determine the start or end of the blend, and if you supply two they are used to determine both ends.
Note: These options can only be used in conjunction with the
walls
tokens PK_blend_walls_trim_no_c and PK_blend_walls_trim_both_c; the blend faces created cannot be attached to the walls. |
Parasolid provides functionality for propagating face-face blends between adjoining faces in a body, provided that the faces meet smoothly at any intervening edges. This simplifies face-face blending by allowing you to specify just the master faces you want to blend; Parasolid can then choose which other faces should be included in the walls in order to propagate the blend as far as possible.
For example, Figure 33-31 shows a body in which only two faces were specified as walls. The blend that was created from these walls was then propagated as far as possible, creating the result shown. Notice that the blend has not propagated across the faces on the left, since the intervening edge is sharp.

Figure 33-31 Propagating face-face blends
|
Note: You cannot use propagation with face-face blends that have a disc or isoparameter cross-section plane. |
Propagation also works in conjunction with holdlines and cliffedges, as described in Section 33.4. Like master faces, this means that you can specify just the first edge in a chain of edges that make up a holdline or cliffedge, provided that the edges in the chain meet smoothly. If you use propagation, and you have specified holdline or cliffedge data, then size constraints are maintained across any faces that are added to the walls as a result of propagation. Inverted cliffedges or holdlines only propagate to other inverted cliffs or holdlines.
In Figure 33-32, by providing the walls and cliffedge shown, and a large radius, propagation creates the face-face blends shown. The cliffedge is maintained along the extent of the blend because of the size of the radius.

Figure 33-32 Propagating cliffedges
Propagation is invoked using the
propagate
option, which takes two values:
You can control the tolerance to within which the edges between faces are considered smooth using the
tolerance
option in PK_FACE_make_blend_o_t.
Note: Parasolid uses both tolerance information on the edges between faces and the
tolerance
specified in PK_FACE_make_blend_o_t to determine whether faces meet smoothly at intervening edges. |
Sometimes you might want to create a face-face blend that extends past a notch, rather than one that stops as soon as it encounters the notch. You can do this using the
notch
option in PK_FACE_make_blend_o_t, which blends across any notches found in either the middle or the end of a wall.
Figure 33-33 illustrates a successful notch overflow in the middle of a blend. In this case, if
notch
is PK_LOGICAL_false, the blend face that is created cannot be successfully attached to the body, and is returned as a separate sheet.

Figure 33-33 Notch overflow in the middle of a blend
A notch overflow at the end of a blend occurs when all of one side of a blend face at the end of the blend is trimmed away. This is shown in Figure 33-34. In this example, if
notch
is PK_LOGICAL_false, then only the first face in the right wall is blended, because the notch occurs while the blend is still in this face. The next face in the right wall is then extended to cap the blend. If
notch
is PK_LOGICAL_true, the blend is extended along all the faces in the right wall.

Figure 33-34 Notch overflow at the end of a blend
In some cases, the data you pass to PK_FACE_make_blend may contain ambiguous information that could cause blending to fail. For example it may be possible to create more than one set of blends between two walls, or you may have supplied holdline data that describes conflicting sets of holdlines, causing confusion over which of several possible blends should be created. This section describes the options Parasolid provides to help you overcome these ambiguities.
Figure 33-35 shows an example in which there are two possible face-face blends. In order to blend the walls indicated, you must do one of the following:
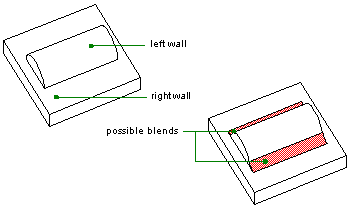
Figure 33-35 Multiple face-face blends
If you do neither of these, Parasolid creates only one blend, but does not guarantee which blend it creates.
A help point is a 3-space vector that is used to distinguish between multiple possible solutions. Parasolid creates whichever blend lies closest to the supplied help point. You should try to make any help points lie as close to the desired blend face as possible; the further away a help point is, the harder it is for Parasolid to identify the correct blend face.
By default, Parasolid only returns one set of blend faces.
In cases where there are conflicting multiple blends, you must supply a help point if you want to have any control over which of the conflicting blends is attached to the body. For example, if you specify several holdlines that lie in the same wall (as shown in Figure 33-36), you must supply a help point if you want to attach one of the blends. If you do not want to attach a blend (i.e., if
walls
is PK_blend_walls_trim_no_c or PK_blend_walls_trim_both_c), then Parasolid returns all solutions if you do not supply a help point. You cannot attach multiple conflicting blends to a body.

Figure 33-36 Resolving conflicting holdline data using help points
The options used to deal with multiple solutions are in PK_FACE_make_blends_o_t. They are as follows:
| Option | Description |
|---|---|
multiple |
Whether or not to create multiple blend sheets. The default is PK_LOGICAL_false. |
have_help_point |
Whether or not a help point is supplied in |
help_point |
A 3-space vector that represents a help point that PK_FACE_make_blend can use to resolve any ambiguity in the supplied data. If a help point is supplied, you should set |
Parasolid can also produce blend ribs instead of, or as well as, blend surfaces in face-face blending. Blend ribs are geometric cross-sections of a blend surface, as shown in Figure 33-37. In general blend ribs are curves, though points are returned if the blend surface is degenerate.
By passing blend ribs to a more general-purpose surface creation tool, you can use them to create surfaces in regions where true blend surfaces cannot be produced, such as regions of tight curvature. For example, if an underlying surface has a tight, narrow crease which causes blending to fail, you can generate ribs and use them to create a surface which approximates the blend.

Figure 33-37 Producing blend ribs instead of a blend surface
|
Note: You can only produce blend ribs if you also supply a parameter spine. See Section 33.3.1, "Supplying a suitable parameter spine" for more information. |
You can choose to produce ribs either:
You can also control how ribs are distributed by grouping them together in a number of ways, and specifying a maximum number of ribs to produce in each group. Ribs are distributed as evenly as possible within each group.
You specify how you want blend ribs to be produced using the
rib_control
structure (PK_blend_rib_control_t) in PK_FACE_make_blend_o_t. This contains the following options:
| Option | Description |
|---|---|
output_rib |
Under what conditions to generate blend ribs. This can take the following values:
|
group_rib |
How to group the ribs that are generated. This can take the following values:
|
max_n_ribs |
The maximum number of ribs to produce in each group. Ribs are distributed across the group as evenly as possible. |
n_interval_parms |
|
interval_parms |
This allows you to specify groups explicitly by defining intervals along the parameter spine that represent the boundaries of each group. The first member of the array defines the start of the first interval, the second member the end of the first interval and the start of the second, and so on. For example, a set of
The |
Ribs are returned in the
ribs
field (PK_blend_rib_r_t) of PK_FACE_make_blend. This contains the following fields:
|
Note: For blends which produce multiple sheets, two ribs may share the same parameter, but will never share the same index. |
To ensure validity of the resulting body, Parasolid can carry out a series of local checks when creating face-face blends.
You can use the
checks
structure (PK_blend_local_check_t) in PK_FACE_make_blend_o_t to control which of these checks to perform. The default value for each field in
checks
ensures that no local checking is performed by default, so as to maximize performance.
PK_FACE_make_blend_o_t also contains a
local_checks
option that provides a quick way of turning on common checking functionality. If you set
local_checks
in PK_FACE_make_blend_o_t to PK_LOGICAL _true, the following local checking is performed:
The table below summaries the fields in the
checks
structure, together with their default values and their values when
local_checks
is PK_LOGICAL_true.
| Option | Default value |
local_checks
value |
|---|---|---|
For more information on Parasolid's checking capability, see Chapter 8, "Checking".
Rather than have Parasolid generate a blend surface, you can supply a surface to use in a blend operation using the
user_surface
field of PK_FACE_make_blend_o_t. When using this option, you should provide consistent
left_sense
and
right_sense
flags. If you don't, then Parasolid attempts to create a valid model, but may fail. See Section 33.2, "Face-face blending concepts", for more information about the sense of a blend.
In order for the blend to succeed, the surface you supply must:

Figure 33-38 Blending faces with a user-supplied surface
In summary, this chapter has given you a complete description of Parasolid's face-face blending functionality.

Figure 33-39 Blending two walls of faces
To return to the example used at the very beginning of the chapter, the disjoint bodies shown in Figure 33-39 have been blended as follows:
xsection
option was set to PK_blend_xs_rolling_ball_c in order to create a rolling ball cross section plane.
radius
field was set to create a constant radius blend
left_sense
and
right_sense
were PK_LOGICAL_true.
trim
option was set to PK_blend_trim_to_walls_c in order to trim the blend faces to the specified walls.
walls
option was set to PK_blend_walls_attach_c in order to attach the blend faces to the specified walls, so that a single body could be created from the two disjoint bodies.
propagate
option was set to PK_blend_propagate_yes_c, to ensure that the blend propagated as far as possible.| <<< Interpreting Edge Blending Error Codes | Chapters | Interpreting Face-Face Blending Error Codes >>> |


