 |
Edge Blending Functions and Options |
Edge Blending Functions and Options
| <<< Edge Blending Overview | Chapters | Edge Blend Overflows >>> |
This chapter explains the functions used to create, enquire and manipulate edge blends, and the options available to control the type and shape of the blend.
| Function | Description |
|---|---|
These functions all attach the relevant blend attribute containing the specified parameters to the given edge. Simple checks are made to ensure the parameters have sensible values.
|
Note: Blend attributes are system defined attributes (see Chapter 46, "Attribute Definitions"), but should not be manipulated using the functions provided for attribute processing. The functions detailed below, which manage the blend attribute for you, should be used. |
PK_EDGE_ask_blend returns information about the parameters of the blending surface on a given edge:
PK_EDGE_find_blend_topol returns the faces and edges which are guaranteed to be affected by the unfixed blend on the specified edge.
PK_BLENDSF_ask returns the standard form of a rolling ball blend surface.
The
unfix_spacing
option to PK_TOPOL_render_line may be used to override the drawing parameters in the individual blend attributes.
PK_EDGE_check_blends checks the unfixed blends. There are a number of limitations on the use of blends, as described under "Limitations on edge blending" in Chapter 29, "Edge Blending Overview".
This function is a diagnostic function, used to determine why PK_BODY_fix_blends failed, or whether an alteration in an unfixed blend has removed a problem. It checks that for each of the edges in the
edges
that has a blend attribute attached, the blending surface parameters are legal. The level of checks completed are determined by the setting of the
level
argument and look for consistency with the geometry and blend attributes attached to neighboring entities. The two levels of checking are:
|
Note: PK_EDGE_check_blends is not foolproof, the only guaranteed test of a blend is to FIX it. |
PK_EDGE_remove_blend removes an unfixed blend from the given edge.
PK_BODY_fix_blends changes any edges of the body which have blend attributes into full faces with the appropriate blending surface geometry.
Local checking may be performed internally, this is controlled by setting the option
local_check
, which by default is set to PK_LOGICAL_false.
The
propagate
option structure is used to control the behavior of propagation while fixing blends.
This option structure is used to identify occasions when the blend can only be fixed successfully if it is propagated onto an additional edge that
Once a case has been identified,
propagate
allows the user to choose between one of the following:
The
propagate
option structure also gives control over the angle past which propagation occurs.
If propagation is prevented, either by setting the
propagate
option in the option structure to PK_LOGICAL_false, or because the callback function returns false, then PK_BODY_fix_blends fails, and returns PK_blend_fault_edge_c together with the tag of the edge onto which propagation would otherwise have occurred.
Using options, the user can control the following blending properties:
edges
(corresponding to a blend face which is derived from a vertex) is the dead tag of an edge or the dead tag of the appropriate vertex
properties
argumentA cliffedge blend is a special case of a blended edge on which the newly created blend face is tangent to only one of the faces adjacent to the original edge and runs along an edge in the other face, i.e. edge A in face B.

In cases where two blends on adjacent edges of different convexity meet at a vertex with three or more edges, you can create a Y-shaped blend, as shown in Figure 30-2. In some cases, a Y-shaped blend provides an alternative type of blend, while in others, a Y-shaped blend is the only blend that can be created at that vertex. Y-shaped blends tend to create faces with a lower curvature than default blending.

The following restrictions apply to Y-shaped blends:

Figure 30-3 Creating two Y-shaped blends at a vertex with (a) intervening smooth edge, and (b) no edge
When three edges meet at the Y-blend vertex, if the non-blended edge is smooth, it is extended to form the end of the patch if possible, as shown in Figure 30-4.

Figure 30-4 Three edge vertex with (a) unblended, (b) default, and (c) Y-shaped blends
If the smooth edge cannot be used to create the end of the patch, Parasolid creates suitable geometry automatically, as shown in Figure 30-5. When four or more edges meet, each non-blended edge is treated independently: if it can be used to create the end of a patch, it is, otherwise, Parasolid creates the necessary geometry.

Figure 30-5 Creating the end of a patch with new geometry
You create Y-shaped blends by specifying values for the
y_blend_data
structure in PK_BODY_fix_blends_o_t. This structure takes the following information:
| Option | Description |
|---|---|
|
Whether or not to create a Y-shaped blend. Default: PK_LOGICAL_false |
|
|
An array of vertices that Y-shaped blends should be created for. |
If Y-shaped blending is switched on, but no vertices are supplied (that is,
y_blend
is PK_LOGICAL_true, and all other values are left at their defaults), then all suitable vertices are Y-blended.
It is possible to overwrite the default behavior of the shape of the blend where three or more blends meet at a common vertex by specifying a setback.
If a setback is specified on an edge which is to be blended, then the blend is trimmed back by approximately the specified distance. The remaining gap is then patched smoothly by a collection of faces. Specifying a setback creates a wider region of transition from one blend to the others. This functionality is not available for chamfers.

Figure 30-6 (a) Default behavior at a 3 edge vertex; (b) Overriding the default behavior by specifying setbacks for each edge
A setback blend can only be applied if you are blending all the edges going into a vertex that has three or more edges running into it.
Specifying a zero setback on an edge ensures that no setback blending occurs on that edge. Note that this is not the same as specifying no setback information. If no setback information is supplied, Parasolid tries to create the best surface possible. In some cases, this may involve creating a setback blend.
Please note that setback information is supplied in PK_BODY_fix_blends (i.e. upon fixing the blend) rather than when setting the blend parameters using PK_EDGE_set_blend_constant.
When specifying setback information, you need to state which end of the edge the setback should be applied to. This is done using the
which_end
option in the options structure of PK_BODY_fix_blends.
You can specify whether or not the integer returned in
edges
(corresponding to a blend face which is derived from a vertex) is the dead tag of an edge or the dead tag of the appropriate vertex.
For example, take a block. When three edges are blended with a common vertex with the same radius, four faces are created (one for each edge and a piece of sphere at the vertex). The tracking information returned by PK_BODY_fix_blends contains an array of blend faces and a parallel array of integers
edges
. The option
vx_twin
enables the vertex faces to be distinguished from those derived directly from edges.
If
vx_twin
is set to true, PK_BODY_fix_blends return the (dead) tag of the appropriate vertex for a
vertex
face as the corresponding entry in
edges
.
PK_BODY_fix_blends
PK_FACE_make_blend
The
check
option allows the following individual checks to be performed:
The default behavior is that any topology in the region completely overlapped by the blend is deleted. For example, if the edge of a block which has a hole in it is blended with a radius sufficiently large that the blend completely overlaps the hole, the hole is deleted along with any topology connected to it.
Setting the
transfer
option results in the hole being preserved by moving it into the new blend face (provided that the original hole is sufficiently deep that it intersects with the blend).

Figure 30-7 Preserving topology that overlaps a blend
When blending sheet bodies, you can retain the shape of any laminar notches on a blend boundary using the
preserve_notch
option. Setting this to PK_LOGICAL_true projects the edges that form the notch normally onto the blend surface, as shown in Figure 30-8.
When blending solid bodies, this option has no effect and is ignored.

Figure 30-8 Retaining notch shape when blending between sheets
The
vx_blend_data
option controls whether to use
vertex blending to further smooth blended edges at any vertex. Vertex blending allows smooth blending past sharp edges of opposite convexity to the blend.
Figure 30-9 shows how vertex blending removes sharp edges that may be created by a blending operation.

Figure 30-9 Behavior of vertex blending
Depending on the edges that are blended, vertex blending can sometimes produce more than one blend surface. In Figure 30-10, the uppermost block tapers on two sides. The resulting vertex blend is created from two blend surfaces.

Figure 30-10 Creating more than one blend surface with vertex blending
To switch vertex blending on, you need to supply the following data for the
vx_blend_data
option:
If vertex blending is switched on, but no vertices are supplied (that is, vertex_blend is PK_LOGICAL_true, and all other values are left at their defaults), then all suitable vertices are blended.
Within the
properties
argument the following blend specific options can be set.
PK_EDGE_set_blend_constant, PK_EDGE_set_blend_chamfer, PK_EDGE_set_blend_variable.
The drawing of ribs,
render_ribs
, by the rendering functions and the approximate separation of the rib lines,
ribspace
.
PK_EDGE_set_blend_constant, PK_EDGE_set_blend_chamfer, PK_EDGE_set_blend_variable.
Blend overflow behavior,
ov_smooth
,
ov_cliff
,
ov_cliff_end
or
ov_notch
.
|
Note: When fixing a blend, it is possible that the blend as defined by its basic parameters would lie outside the faces adjacent to the edge being blended. If this is so, the blend must overflow. |
For further information on blend overflows please refer to Chapter 31, "Edge Blend Overflows".
PK_EDGE_set_blend_constant, PK_EDGE_set_blend_chamfer, PK_EDGE_set_blend_variable.
Whether or not the blend is fixed by PK_BODY_fix_blends, checked by PK_EDGE_check_blends or drawn by the rendering functions - '
draw_fix
.
The default action is for an unfixed blend to be fixed, checked and drawn as required. If
draw_fix
is set to PK_LOGICAL_false, the blend is not fixed, checked, or drawn. However if another blend is set on that edge, the original attribute (with draw_fix set to false) is overwritten. In practice, this option is used by very few applications.
PK_EDGE_set_blend_constant, PK_EDGE_set_blend_chamfer, PK_EDGE_set_blend_variable.
That the blend is propagated over tangent edges, or past other blends if the resultant three edge vertex would otherwise be invalid -
propagate
.
This parameter is invalid for cliff edge blends.
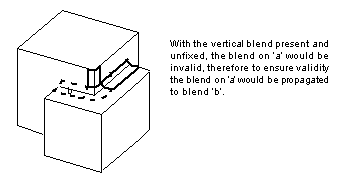
Figure 30-11 Propagation of a blend past an invalid vertex
PK_EDGE_set_blend_chamfer, PK_EDGE_set_blend_variable.
Setting a user defined tolerance for the blended edge -
tolerance
.
The
vary
option specifies that a variable rolling ball blend varies linearly along the length of the edge.
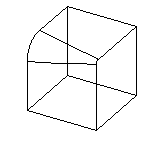
Figure 30-12 Causing the blend ranges to vary naturally
The default behavior of this option is for the range variation to be constrained in such a way as to ensure that the variable radius blend meets other blends smoothly (i.e. tangentially) at the vertices; by causing the radius to have a constant extension.

Figure 30-13 Default behavior of
vary
If your application uses models created using Parasolid V12.1 or earlier, you can use the
update
option to help eliminate differences in rebuild results. This option lets you turn off some of the edge blending enhancements added at Parasolid V13.0, such as advanced capping techniques, to ensure that edge blending gives the same results in the latest version of Parasolid as in Parasolid V12.1 or earlier. This option takes two values:
| Value | Description |
|---|---|
|
Disables some of the enhancements added at Parasolid V13.0 (the default). When dealing with models from old versions of Parasolid, you can use this value to ensure that PK_BODY_fix_blends will produce the Parasolid V12.1 result. |
|
|
Enables some of the enhancements added at Parasolid V13.0. In general, you are recommended to use this value whenever possible, and only use PK_blend_edge_update_0_c when it is essential that PK_BODY_fix_blends returns the Parasolid V12.1 result to the blend. |
| <<< Edge Blending Overview | Chapters | Edge Blend Overflows >>> |