Patterns
Solid modeling often involves the repetition of features or objects arranged in a regular or irregular manner (copied and transformed), which may be referred to as patterns (refer to the following figure). Examples of patterns include the radial arrangement of holes in a shower head, the linear grating of ventilation holes on a computer monitor, or the treads on a tire. Implementing such patterns can become unnecessarily burdensome, especially when the number of repetitive elements grows large.

Figure. Pattern of Grooves
The ACIS patterns functionality is intended to reduce this burden by giving programmers tools that facilitate pattern creation and modification. These tools include the pattern class and several functions and methods for working with patterns.
A pattern object is created and applied to an entity or feature. An entity to which a pattern is applied is called a seed entity. A pattern object defines the transformations needed to generate the way multiple copies of the seed entity are to be arranged and scaled in a model. The transformations may be given as a simple list, to be merely wrapped by the pattern object. However, the transformations for regular patterns can be expressed more efficiently in terms of ACIS laws.
By using the ACIS pattern tools, a developer can expect to realize the following advantages:
- It is simpler to create any of a large class of patterned solids
- Features generated by repetitive Boolean operations can be generated with a single such operation, enhancing performance
- SAT files can be substantially compressed, especially with large, regular patterns
With the ACIS patterns functionality, an application can:
- Create a variety of pre-built geometric patterns in one, two, or three dimensions (linear, hexagonal, circular, elliptical, polar, cylindrical, spherical)
- Create patterns that follow curves and surfaces, both in position and in orientation
- Create patterns based on lists of positions or transformations
- Create scaling patterns (that is, patterns that scale elements in a regular fashion)
- Create patterned filters to remove or retain elements in a regular fashion
- Move, rotate, scale, or remove individual elements within an existing pattern
- Apply random rotations or translations to pattern elements to create partially randomized patterns
- Compose patterns with one another (for example, a circular pattern of linear arrays)
- Concatenate patterns with one another (for example, a circular pattern linked to the end of a linear array)
- Reflect and mirror patterns
- Pattern Object Contents
- Steps for Using Patterns
- Working with Patterns
- Hints to Avoid Problems
- C++ Examples Using Patterns
- Scheme Examples Using Patterns
Pattern Object Contents
Internally, ACIS pattern objects (implemented in class pattern) contain the information to provide the full set of transformations needed to define a pattern:
- Root transformation
- An optional transformation used to reposition the seed entity
- Relative transformations
- Transformations used to generate one pattern element from the previous one
There are two ways in which the relative transformations can be generated:
- Through ACIS laws that can be used to generate transforms
- Through lists of specific transforms
Law and list transforms can coexist. If a list item exists for the transform needed to define a particular element, then it always overrides the transform given by a law. In this way, it is possible to take a pattern defined by laws and still have particular elements repositioned or re-oriented, simply by adding the appropriate list item.
In addition to transform information, the pattern objects contain "keep" information, which is held by both a law and the list. This information governs whether or not a particular element will appear in the final pattern, or will instead be filtered out. As with the transforms, the list value overrides the law value, if the list item is present.
Steps for Using Patterns
The use of patterns can be summarized in the following steps:
-
Create the entity or feature to which the pattern is to be applied.
-
Create an ACIS pattern object using the pattern API functions.
-
Use the
api_pattern_apply_to_entity function to apply the pattern
object to the entity or feature. If applied to a feature, the user must specify
an entity that will identify the feature (for example, one face of a bump that
is to be patterned). An entity to which a pattern is applied is called a seed
entity. The entities generated by the pattern are "true" ACIS entities (ENTITY
classes). Entities of type
BODY,
LUMP,
SHELL,
FACE, and
LOOP support patterns.
-
If a pattern element is modified, use
api_pattern_update_entities to have the modification propagate
to the other elements.
-
Clean up any memory associated with the pattern when finished.
- Save the part if desired. The pattern is automatically saved-if saving it will not result in a loss of information (refer to section Patterns, Attributes, and Tags).
Working with Patterns
This section discusses some of the issues an application developer needs to understand when working with patterns, such as applying a pattern, saving a pattern, removing a pattern, etc.
Applying Patterns to Entities
A pattern is generated by creating a pattern object and applying the pattern object to an entity or feature. An entity to which a pattern is applied is called a seed entity. If a pattern is applied to a feature, an entity that will identify the feature (for example, one face of a bump that is to be patterned) must be specified. The entities generated by the application of the pattern are "true" ACIS entities (ENTITY classes). Entities of type BODY, LUMP, SHELL, FACE, and LOOP support patterns.
Saving Patterns
A pattern object that is attached to an entity is automatically saved with the seed entity unless the save operation removes the pattern (refer to section Pattern Safety). Because the pattern object contains the information needed to regenerate the other pattern elements, the other pattern elements are not saved, except for their tags and pattern-compatible attributes (refer to section Patterns, Attributes, and Tags).
A pattern object may be saved independently using the api_pattern_to_entity function, which creates an ENTITY-derived APATTERN object that is savable (like any entity).
Patterns Safety
In general, when an element within a pattern is modified geometrically or topologically, that element is no longer considered by ACIS to be part of the pattern. Its constituent entities are thus converted to independent entities, each of which is saved in its entirety when the associated part is saved. This ensures that the modifications are not lost during the save operation.
Modifications that do not involve changing an entity's topology or geometry (for example, changing the color of a patterned face) do not remove the corresponding element from the pattern. This includes changes made to the pattern itself prior to its application to a seed entity.
Refreshing Patterns
Modifying an element may automatically remove the pattern from that element, as mentioned in Patterns Safety. However, the entire pattern may be refreshed to incorporate the changes by using the api_pattern_update_entities function.
Patterns, Attributes, and Tags
ACIS patterns are designed to accommodate both tags and attributes (ACIS objects derived from the ATTRIB class). The tags of all pattern elements are saved, even when their associated entities are not. Attributes, on the other hand, are considered either pattern-incompatible or pattern-compatible, depending upon whether or not they contain references to entities other than their owning entities.
When the entities comprising a part contain one or more pattern-incompatible attributes, the pattern is removed prior to a save operation, causing all elements to be saved in their entirety. When all attributes are pattern-compatible, the pattern remains on the part, and the attributes are saved and restored independently of their owning entities (except for those attached to the seed entity).
For safety, the ATTRIB base class marks all attributes as pattern-incompatible, via a virtual function. When a class is derived from ATTRIB, it is the developer's responsibility to determine if the class is pattern-compatible, and if so, to mark it as such.
Patterns and Bumps
A bump refers to any feature that is "Booleaned" onto/into a larger entity. With this definition, holes are considered to be bumps.
When an application needs to create an array of identical bumps, such as a two-dimensional array of spherical bumps upon a planar substrate, it is obviously wasteful to perform the Boolean operation that creates the bump more than once. The results of the repeated Booleans are guaranteed to be identical, except for a simple transformation. The use of ACIS patterns avoids such redundant calculations, by performing the Boolean operation before applying the pattern to one face (or loop) of the resulting bump.
When applying a pattern to a bump, apply it to the highest-level entity associated with the bump. For example, if one creates a hollow shell within a block by subtracting a sphere, apply the pattern to the shell, not to the face owned by the shell.
In the case in which a bump consists of multiple faces and loops, only one entity belonging to a bump needs to be specified when applying the pattern, as ACIS automatically generates the others.
When applying a pattern to a bump consisting of multiple faces, make sure that the face used to identify the bump will make the determination of the bump's extent unambiguous. For example, consider a hole with a raised face above a surrounding substrate. If the programmer uses the hole's inner face to identify the bump, it is not clear whether the bump is to include the raised face, or if the raised face is instead to be considered part of the substrate on which the bump is to be repeated. To make sure that the raised face is considered as part of the bump, the programmer should that face instead of the inner face to identify the bump.
Patterns Annotations
Pattern operations support feature naming (see the Technical Article Feature Naming and Annotations for a general discussion of this topic) by means of ACIS annotations. With the annotations option set to TRUE, patterned entities that possess geometry - FACEs, COEDGEs, EDGEs, and VERTEXs - are automatically associated with PATTERN_ANNOTATION objects that can be queried in the usual way, via the api_find_annotations function.
Once identified, the seed and generated methods of the PATTERN_ANNOTATION class may be used to return the original patterned entity and those generated by means of the pattern, respectively. In addition, the element method can be used to return a patterned entity based upon its index.
Hints to Avoid Problems
To avoid problems when using patterns, the developer should keep these hints in mind:
-
Patterns involve transformations that may include rotation and scaling, both of
which require the specification of a fixed point about which the operation is
to take place. This point is referred to as the pattern's root position. A few
patterns are independent of the root position (for example, linear patterns,
and circular patterns in which the elements rotate with the pattern), but this
is not generally the case. Incorrectly specifying this item can lead to
unexpected results.
-
Some pattern class methods that refer to individual pattern elements do so by
means of pattern coordinates. For patterns of more than one dimension, refer to
the class documentation to ascertain the order in which the coordinates are to
be specified. For example, in radial patterns the order is (radial, angular).
-
The pattern objects are reference counted. To avoid memory leaks, call the
api_pattern_destroy after a pattern has been applied to an
entity.
- When creating a pattern from a list of transforms, keep in mind that these items are relative transforms. To position the first (seed) entity requires furnishing a root transformation in addition to these relative ones.
C++ Examples Using Patterns
This section includes some examples to help you get started working with patterns. These examples show first how to apply a pattern, and then various ways to create the pattern object itself. The examples are C++ code snippets for illustrating how to use the functionality. They are not intended to be complete, compilable, and runnable programs.
Using Function api_pattern_apply_to_entity
Suppose that you have already created an ENTITY object named ent and a pattern object named pat. Generating the pattern can be as simple as calling api_pattern_apply_to_entity:
| outcome result = api_pattern_apply_to_entity(ent, pat); |
On the other hand, if you want to apply the pattern to a bump that is a part of ent, it is first necessary to pick out an entity that can be used to identify the bump. For example, if ent is a sheet body with holes in it, and you want to apply the pattern to a hole, pick out the LOOP object defining the hole first:
ENTITY_LIST loop_list; outcome result = api_get_loops(ent, loop_list); LOOP* hole_loop = (LOOP*)loop_list[1]; |
and then apply the pattern to this object:
| result = api_pattern_apply_to_entity(hole_loop, pat); |
Creating a Linear Array of Bumps
Suppose that you want to create a three-dimensional linear array of a LUMP object ent. Creating the necessary pattern object, pat, is most easily done by using the api_pattern_create_linear function, which requires that you specify the base displacements in three directions (which need not be orthogonal), and the number of corresponding pattern elements desired in each direction:
|
// define the pattern parameters pattern* pat = NULL; SPAvector x_dir(. . .,. . .,. . .); SPAvector y_dir(. . .,. . .,. . .); SPAvector z_dir(. . .,. . .,. . .); int num_x = . . .; int num_y = . . .; int num_z = . . .; // create the pattern outcome result = api_pattern_create_linear(pat, x_dir, num_x, y_dir, num_y, z_dir, num_z); check_outcome(result); // apply the pattern result = api_pattern_apply_to_entity(ent, pat); check_outcome(result); // clean up result = api_pattern_destroy(pat); check_outcome(result); |
Creating a Radial Array of Bumps
Suppose that you want to create a radial pattern of bumps on a BODY object ent. As with the linear pattern example, radial patterns have an API function to facilitate their creation. The default behavior of this function:
- Produces pattern elements that rotate with the pattern
- Chooses an arbitrary starting direction (perpendicular to the specified normal)
- Fills a full 360-degree angle
- Uses a perfect circle as its elliptical perimeter
To use the default behavior, you can generate and apply the pattern as follows:
|
// define the pattern parameters pattern* pat = NULL; SPAposition center(,. . .,. . .); SPAvector normal(. . .,. . .,. . .); double spacing = . . .; int num_radial = . . .; int num_angular = . . .; // create the pattern outcome result = api_pattern_create_radial(pat, center, normal, num_radial, num_angular, spacing); check_outcome(result); // define the bump by one of its faces ENTITY_LIST face_list; result = api_get_faces(ent, face_list); check_outcome(result); FACE* bump_face = face_list[0]; // apply the pattern to the face result = api_pattern_apply_to_entity(bump_face, pat); check_outcome(result); // clean up result = api_pattern_destroy(pat); check_outcome(result); |
Putting a Pattern Along a Surface
Suppose that you have a face, called face, and you want to produce a pattern of elements, from the seed entity ent, that follow the face's surface both in terms of position and direction. The function api_pattern_create_on_surface can be used with either a surface or a face.
You must specify the point, named root in this example, to be mapped to the pattern sites on the face. This may be a point on the seed entity, if you want the seed entity to intersect the face, but it need not be. You may simply wish to create a pattern that is parallel to the face, at some distance, in which case you can specify a point removed from the seed entity. Similarly, you need to specify the directions to be mapped to the two orthogonal tangent directions of the surface. For example, call these u_dir and v_dir, since they correspond to the uv parameterization of the face's surface. You may then proceed as follows:
|
// define the pattern parameters pattern* pat = NULL; int num_u = . . .; int num_v = . . .; SPAposition root(. . ., . . ., . . .); logical on_boundary = . . .; SPAvector u_dir(. . ., . . ., . . .); SPAvector v_dir(. . ., . . ., . . .); // create the pattern outcome result = api_pattern_create_on_surface(pat, face, num_u, num_v, root, on_boundary, u_dir,v_dir); check_outcome(result); // apply the pattern result = api_pattern_apply_to_entity(ent, pat); check_outcome(result); // clean up result = api_pattern_destroy(pat); check_outcome(result); |
Scheme Examples Using Patterns
This section includes some simple Scheme examples that illustrate patterns.
Rectangular Vents
This example shows a rectangular array of vent holes.
|
(define glv (view:hoops)) (define w1 (wire-body (edge:linear (position -50 0 -50) (position 50 0 -50)))) (define w2 (wire-body (edge:circular (position 0 -50 50 ) 30 0 180))) (define sht (sheet:2d (sheet:skin-wires (list w1 w2)))) (define f (car (entity:faces sht))) (define p (pattern:surface f 8 6 (position 0 0 0) #f (gvector 1 0 0) (gvector 0 1 0))) (define s (solid:block (position -2 -3 -4) (position 2 3 4))) (entity:set-color s 1) (entity:pattern s p) (bool:subtract sht s) |

Figure. Rectangular Vents
Shower Head
This example shows a radial arrangement of holes in a shower head.
|
(define glv (view:hoops)) (define blank (solid:cylinder (position 0 0 -2) (position 0 0 2) 200 1)) (entity:set-color blank (color:rgb .8 .8 .8)) (define tool (solid:cylinder (position 0 0 -5) (position 0 0 5)10)) (define pat (pattern:polar-grid (position 0 0 0) (gvector 0 0 1) 6 40 (gvector 0 1 0) #t #t)) (pattern:mod-linear-scale pat 2 0.1 0 (position 0 0 0)) (entity:pattern tool pat) (solid:subtract blank tool) |
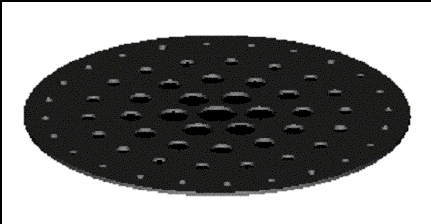
Figure. Shower Head
[Top]
© 1989-2007 Spatial Corp., a Dassault Systèmes company. All rights reserved.